Compaq Armada m300 Compaq Armada M300 Series of Personal Computers Maintenance - Page 40
Table 2-12, Solving Hard Drive, Problems, Possible Cause, Solution
 |
View all Compaq Armada m300 manuals
Add to My Manuals
Save this manual to your list of manuals |
Page 40 highlights
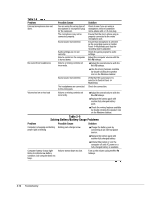
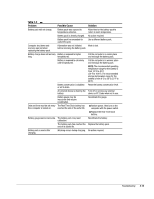
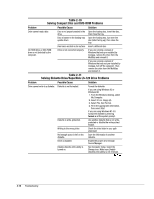
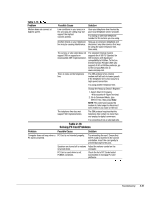
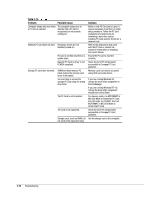
Table 2-11 Continued Problem System cannot start up from diskette or SuperDisk LS-120 drive. Problem Accessing information on the hard drive is much slower than usual. Hard drive does not work. Errors occur after starting from an additional hard drive. System does not recognize a hard drive. DriveLock settings cannot be accessed in Computer Setup. Possible Cause A bootable diskette is not in the drive. Solution Verify that a diskette with the necessary system files is in the drive. Diskette bootability is disabled in Enable diskette bootability in Computer Setup. Computer Setup, Security menu. Table 2-12 Solving Hard Drive Problems Possible Cause Solution Hard drive entered low power state due to timeout and is now exiting from it. Wait for the system to restore the previously saved data to its state prior to initiating a low power state. Hard drive is fragmented/not optimized or has errors. Run ScanDisk and Disk Defragmenter. Hard drive is not seated properly. Turn off and unplug the computer, remove the hard drive, and reinsert the hard drive. Additional hard drive has not been Boot from the original hard drive or a specially prepared with necessary specially prepared hard drive. software. The drive is not seated properly. Remove, then reinsert the drive. The drive is damaged. The drive was inserted while system was on or in Suspend or Hibernation. The DriveLock settings are accessible only when you enter Computer Setup by turning on (not restarting) the computer. Run ScanDisk on the drive. Shut down the computer before inserting removing a hard drive. Completely turn off the computer. Turn the computer back on, then run Computer Setup by pressing F10 when the blinking cursor light appears upper-right on the screen. Troubleshooting 2-17
-
 1
1 -
2
-
3
-
4
-
5
-
6
-
7
-
8
-
9
-
10
-
11
-
12
-
13
-
14
-
15
-
16
-
17
-
18
-
19
-
20
-
21
-
22
-
23
-
24
-
25
-
26
-
27
-
28
-
29
-
30
-
31
-
32
-
33
-
34
-
 35
35 -
 36
36 -
 37
37 -
 38
38 -
 39
39 -
 40
40 -
 41
41 -
 42
42 -
 43
43 -
 44
44 -
 45
45 -
46
-
47
-
48
-
49
-
50
-
51
-
52
-
53
-
54
-
55
-
56
-
57
-
58
-
59
-
60
-
61
-
62
-
63
-
64
-
65
-
66
-
67
-
68
-
69
-
70
-
71
-
72
-
73
-
74
-
75
-
76
-
77
-
78
-
79
-
80
-
81
-
82
-
83
-
84
-
85
-
86
-
87
-
88
-
89
-
90
-
91
-
92
-
93
-
94
-
95
-
96
-
97
-
98
-
99
-
100
-
101
-
102
 |
 |
