Compaq Armada m300 Compaq Armada M300 Series of Personal Computers Maintenance - Page 79
Switch Cover, Remove the two screws from the rear panel of the computer that secure the switch
 |
View all Compaq Armada m300 manuals
Add to My Manuals
Save this manual to your list of manuals |
Page 79 highlights
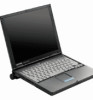
5.13 Switch Cover 1. Prepare the computer for disassembly (Section 5.5). 2. Remove the keyboard (Section 5.11). 3. Position the computer so the rear panel faces forward. 4. Remove the two screws from the rear panel of the computer that secure the switch cover to the base assembly (Figure 5-18). Figure 5-18. Removing the Switch Cover Screws 5-20 Removal and Replacement Procedures
-
 1
1 -
2
-
3
-
4
-
5
-
6
-
7
-
8
-
9
-
10
-
11
-
12
-
13
-
14
-
15
-
16
-
17
-
18
-
19
-
20
-
21
-
22
-
23
-
24
-
25
-
26
-
27
-
28
-
29
-
30
-
31
-
32
-
33
-
34
-
35
-
36
-
37
-
38
-
39
-
40
-
41
-
42
-
43
-
44
-
45
-
46
-
47
-
48
-
49
-
50
-
51
-
52
-
53
-
54
-
55
-
56
-
57
-
58
-
59
-
60
-
61
-
62
-
63
-
64
-
65
-
66
-
67
-
68
-
69
-
70
-
71
-
72
-
73
-
 74
74 -
 75
75 -
 76
76 -
 77
77 -
 78
78 -
 79
79 -
 80
80 -
 81
81 -
 82
82 -
 83
83 -
 84
84 -
85
-
86
-
87
-
88
-
89
-
90
-
91
-
92
-
93
-
94
-
95
-
96
-
97
-
98
-
99
-
100
-
101
-
102
 |
 |

5-20
Removal and Replacement Procedures
5.13
Switch Cover
1.
Prepare the computer for disassembly (Section 5.5).
2.
Remove the keyboard (Section 5.11).
3.
Position the computer so the rear panel faces forward.
4.
Remove the two screws from the rear panel of the computer that secure the switch
cover to the base assembly (Figure 5-18).
Figure 5-18.
Removing the Switch Cover Screws