Compaq Portable 486 Compaq Portable 486c Personal Computer Maintenance and Ser - Page 76
Display Assembly, Before touching the display assembly, be sure you are discharged of static
 |
View all Compaq Portable 486 manuals
Add to My Manuals
Save this manual to your list of manuals |
Page 76 highlights
Display Assembly To remove the display assembly, complete the following steps: 1. Remove the keyboard (Section 5.5). 2. Remove the front bezel (Section 5.14). WARNING The display inverter board contains High Voltage. Avoid contact with all surfaces of the display inverter board when removing the display assembly CAUTION Before touching the display assembly, be sure you are discharged of static electricity by touching a grounded metal object 3. Using a Torx T-15 screwdriver, remove four screws securing the display assembly (Figure 5-21).
-
 1
1 -
2
-
3
-
4
-
5
-
6
-
7
-
8
-
9
-
10
-
11
-
12
-
13
-
14
-
15
-
16
-
17
-
18
-
19
-
20
-
21
-
22
-
23
-
24
-
25
-
26
-
27
-
28
-
29
-
30
-
31
-
32
-
33
-
34
-
35
-
36
-
37
-
38
-
39
-
40
-
41
-
42
-
43
-
44
-
45
-
46
-
47
-
48
-
49
-
50
-
51
-
52
-
53
-
54
-
55
-
56
-
57
-
58
-
59
-
60
-
61
-
62
-
63
-
64
-
65
-
66
-
67
-
68
-
69
-
70
-
 71
71 -
 72
72 -
 73
73 -
 74
74 -
 75
75 -
 76
76 -
 77
77 -
 78
78 -
 79
79 -
 80
80 -
 81
81 -
82
-
83
-
84
-
85
-
86
-
87
-
88
 |
 |

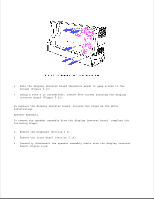
Display Assembly
To remove the display assembly, complete the following steps:
1. Remove the keyboard (Section 5.5).
2. Remove the front bezel (Section 5.14).
>>>>>>>>>>>>>>>>>>>>>>>>>>>>>>>>>>>>>>><<<<<<<<<<<<<<<<<<<<<<<<<<<<<<<<<<<<<<<
WARNING
The display inverter board contains High Voltage. Avoid contact with all
surfaces of the display inverter board when removing the display assembly.
>>>>>>>>>>>>>>>>>>>>>>>>>>>>>>>>>>>>>>><<<<<<<<<<<<<<<<<<<<<<<<<<<<<<<<<<<<<<<
CAUTION
Before touching the display assembly, be sure you are discharged of static
electricity by touching a grounded metal object.
>>>>>>>>>>>>>>>>>>>>>>>>>>>>>>>>>>>>>>><<<<<<<<<<<<<<<<<<<<<<<<<<<<<<<<<<<<<<<
3. Using a Torx T-15 screwdriver, remove four screws securing the display
assembly (Figure 5-21).