Compaq Portable 486 Compaq Portable 486c Personal Computer Maintenance and Ser - Page 77
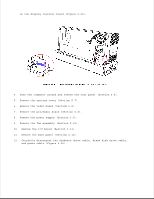
Backlight Assembly, To remove the backlight assembly, complete the following steps
 |
View all Compaq Portable 486 manuals
Add to My Manuals
Save this manual to your list of manuals |
Page 77 highlights
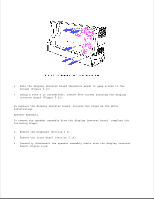
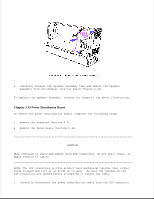
CAUTION When removing or inserting cables with ZIF connectors, do not pull, twist, or apply tension to cables NOTE: The ZIF connectors in this product have mechanical latches that either slide forward and lift up or slide up to open. Be sure the latches on the ZIF connectors are opened before attempting to remove the cable. 4. Carefully disconnect the video board cable from the ZIF connector (Figure 5-21). 5. Carefully disconnect two display inverter board cables (Figure 5-21). 6. Remove the display assembly and the display shield (Figure 5-21). To replace the display assembly, reverse the steps in the above illustrations CAUTION Do not clean the display screen with soap or isopropyl alcohol. Gently wipe the display screen with a clean, low lint cloth, moistened with water Backlight Assembly To remove the backlight assembly, complete the following steps: 1. Remove the keyboard (Section 5.5). 2. Remove the front bezel (Section 5.14). 3. Remove the display assembly (Section 5.14). CAUTION Before touching the display assembly, be sure you are discharged of static electricity by touching a grounded metal object
-
 1
1 -
2
-
3
-
4
-
5
-
6
-
7
-
8
-
9
-
10
-
11
-
12
-
13
-
14
-
15
-
16
-
17
-
18
-
19
-
20
-
21
-
22
-
23
-
24
-
25
-
26
-
27
-
28
-
29
-
30
-
31
-
32
-
33
-
34
-
35
-
36
-
37
-
38
-
39
-
40
-
41
-
42
-
43
-
44
-
45
-
46
-
47
-
48
-
49
-
50
-
51
-
52
-
53
-
54
-
55
-
56
-
57
-
58
-
59
-
60
-
61
-
62
-
63
-
64
-
65
-
66
-
67
-
68
-
69
-
70
-
71
-
 72
72 -
 73
73 -
 74
74 -
 75
75 -
 76
76 -
 77
77 -
 78
78 -
 79
79 -
 80
80 -
 81
81 -
 82
82 -
83
-
84
-
85
-
86
-
87
-
88
 |
 |
