Compaq Portable 486 Compaq Portable 486c Personal Computer Maintenance and Ser - Page 82
Remove the I/O board
 |
View all Compaq Portable 486 manuals
Add to My Manuals
Save this manual to your list of manuals |
Page 82 highlights
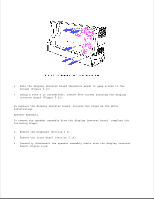
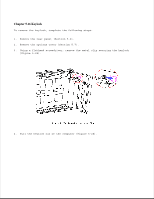
on the display inverter board (Figure 5-25). 4. Turn the computer around and remove the rear panel (Section 5.6). 5. Remove the options cover (Section 5.7). 6. Remove the video board (Section 5.8). 7. Remove the processor board (Section 5.8). 8. Remove the power supply (Section 5.9). 9. Remove the fan assembly (Section 5.10). 10. Remove the I/O board (Section 5.11). 11. Remove the base panel (Section 5.12). 12. Carefully disconnect the diskette drive cable, fixed disk drive cable, and power cable (Figure 5-26).
-
 1
1 -
2
-
3
-
4
-
5
-
6
-
7
-
8
-
9
-
10
-
11
-
12
-
13
-
14
-
15
-
16
-
17
-
18
-
19
-
20
-
21
-
22
-
23
-
24
-
25
-
26
-
27
-
28
-
29
-
30
-
31
-
32
-
33
-
34
-
35
-
36
-
37
-
38
-
39
-
40
-
41
-
42
-
43
-
44
-
45
-
46
-
47
-
48
-
49
-
50
-
51
-
52
-
53
-
54
-
55
-
56
-
57
-
58
-
59
-
60
-
61
-
62
-
63
-
64
-
65
-
66
-
67
-
68
-
69
-
70
-
71
-
72
-
73
-
74
-
75
-
76
-
 77
77 -
 78
78 -
 79
79 -
 80
80 -
 81
81 -
 82
82 -
 83
83 -
 84
84 -
 85
85 -
 86
86 -
 87
87 -
88
 |
 |

on the display inverter board (Figure 5-25).
4. Turn the computer around and remove the rear panel (Section 5.6).
5. Remove the options cover (Section 5.7).
6. Remove the video board (Section 5.8).
7. Remove the processor board (Section 5.8).
8. Remove the power supply (Section 5.9).
9. Remove the fan assembly (Section 5.10).
10. Remove the I/O board (Section 5.11).
11. Remove the base panel (Section 5.12).
12. Carefully disconnect the diskette drive cable, fixed disk drive cable,
and power cable (Figure 5-26).