Creative ZENV30GBBK User Guide
Creative ZENV30GBBK - Zen Vision 30 GB Multimedia Player Manual
 |
UPC - 054651112056
View all Creative ZENV30GBBK manuals
Add to My Manuals
Save this manual to your list of manuals |
Creative ZENV30GBBK manual content summary:
- Creative ZENV30GBBK | User Guide - Page 1
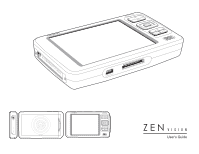
VISION User's Guide - Creative ZENV30GBBK | User Guide - Page 2
this manual may be reproduced or transmitted in any form or by any means, electronic or mechanical, including photocopying and recording, for any purpose without the written permission of Creative Technology Ltd. Copyright © 2005 Creative Technology Ltd. All rights reserved. The Creative logo, Zen - Creative ZENV30GBBK | User Guide - Page 3
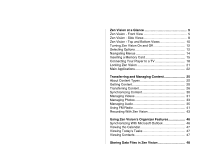
Vision at a Glance 5 Zen Vision - Front View 5 Zen Vision - Side Views 8 Zen Vision - Top and Bottom Views 10 Turning Zen Vision On and Off 12 Selecting Options 12 Navigating Menus 14 Inserting a Memory Card 15 Connecting Your Player to a TV 18 Locking Zen Vision 21 Main Applications 22 - Creative ZENV30GBBK | User Guide - Page 4
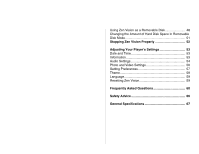
as a Removable Disk 48 Changing the Amount of Hard Disk Space in Removable Disk Mode 51 Stopping Zen Vision Properly 52 Adjusting Your Player's Settings 53 Date and Time 53 Information 53 Audio Settings 54 Photo and Video Settings 56 Setting Preferences 57 - Creative ZENV30GBBK | User Guide - Page 5
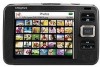
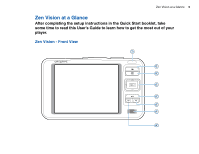
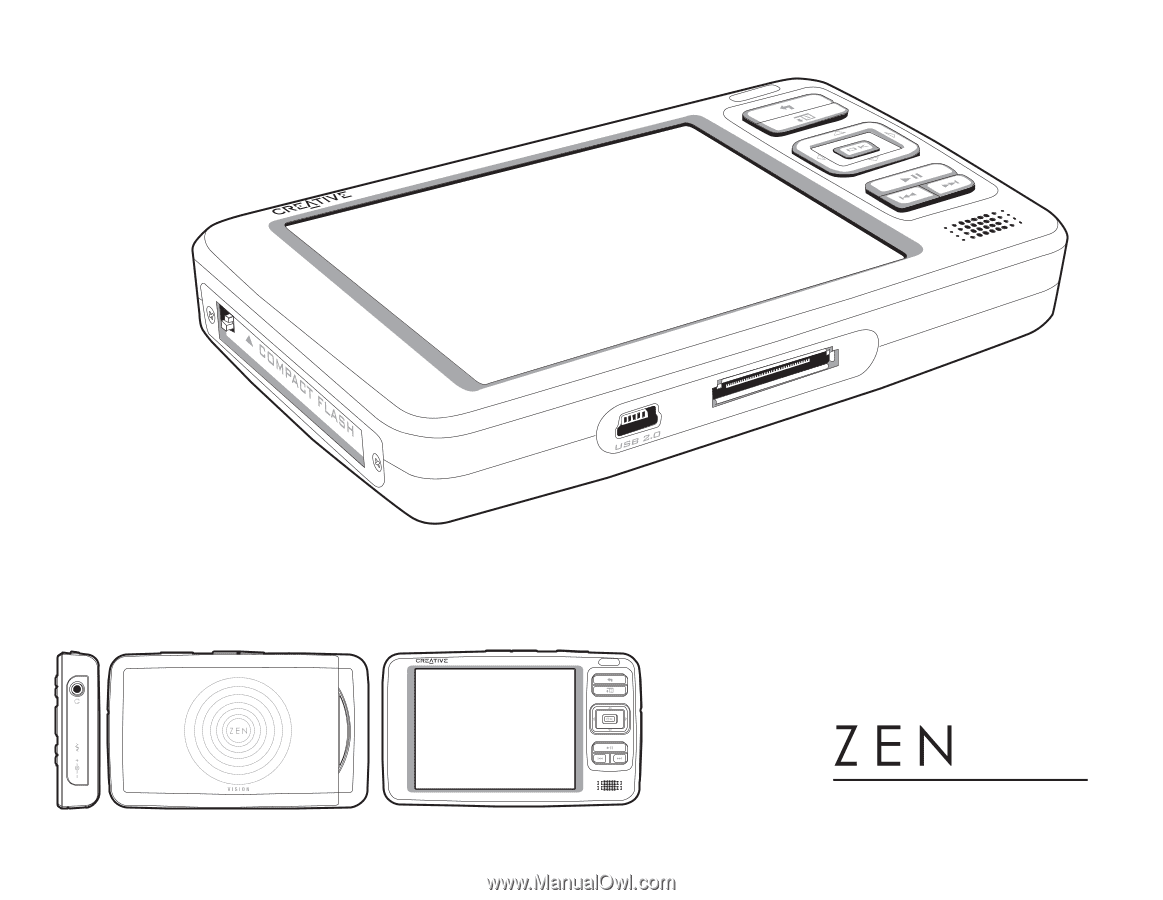
Zen Vision at a Glance 5 Zen Vision at a Glance After completing the setup instructions in the Quick Start booklet, take some time to read this User's Guide to learn how to get the most out of your player. Zen Vision - Front View 1 2 3 4 5 6 7 8 - Creative ZENV30GBBK | User Guide - Page 6
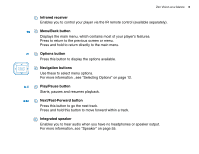
Zen Vision at a Glance 6 1 Infrared receiver Enables you to control your player via the IR remote control (available separately). 2 Menu/Back button Displays the main menu, - Creative ZENV30GBBK | User Guide - Page 7
button to move back within a track. Zen Vision at a Glance 7 NOTE In the Creative Zen Vision LCD interfering with your use, contact Customer Support Services. You can find Customer Support Services information in the Installation and Applications CD. Go to d:\support\\\support - Creative ZENV30GBBK | User Guide - Page 8
Zen Vision - Side Views 1 2 3 4 Zen Vision at a Glance 8 - Creative ZENV30GBBK | User Guide - Page 9
Zen Vision at a Glance 9 1 Compact Flash memory card slot Insert a memory card into this slot. For more information, see "Inserting a Memory Card" on page 15. 2 Headphone jack Connect earphones to this jack. 3 A/V Out jack To conveniently view videos or photos stored in your player, connect your - Creative ZENV30GBBK | User Guide - Page 10
Zen Vision - Top and Bottom Views Zen Vision at a Glance 10 1 2 3 4 5 7 6 - Creative ZENV30GBBK | User Guide - Page 11
Zen Vision at a Glance 11 1 Volume Decrease button Decreases the volume. Press and hold to and hold the switch towards the Power icon to turn your player on or off. For more information, see "Turning Zen Vision On and Off" on page 12. 4 Lock icon Slide the switch to the right to disable your player's - Creative ZENV30GBBK | User Guide - Page 12
a Glance 12 Turning Zen Vision On and Off 1 To turn on your player, slide the Power switch towards the Power there until the LCD lights up. 2 To turn off - Creative ZENV30GBBK | User Guide - Page 13
Zen Vision at a Glance 13 1 Up button Press to go to the menu option or selection above the current selection. 2 OK button Press to select the - Creative ZENV30GBBK | User Guide - Page 14
Zen Vision at a Glance 14 Navigating Menus Press the Up or Down navigation button to move vertically in a menu. Menu Music Library Photos Videos FM Radio - Creative ZENV30GBBK | User Guide - Page 15
Zen Vision at a Glance 15 Inserting a Memory Card For information on transferring files from your memory card to your player, see "Transferring content from your memory card" on page 28. 1 Align the memory card with the Compact Flash memory card slot as shown below. - Creative ZENV30GBBK | User Guide - Page 16
Zen Vision at a Glance 16 2 Gently push the memory card into the Compact Flash memory card slot. NOTE Do not force the memory card into the Compact Flash memory card slot. If it does not fit properly, gently remove it and try again. - Creative ZENV30GBBK | User Guide - Page 17
Zen Vision at a Glance 17 3 To remove the memory card, pull out the memory card as shown below. NOTE To avoid permanent damage: ■ DO NOT shake the memory card when removing it. ■ Remove the memory card only when when your player is at the Main Menu or when your player is turned off . - Creative ZENV30GBBK | User Guide - Page 18
Zen Vision at a Glance 18 Connecting Your Player to a TV To view your player's content on a larger screen, connect your player the display format that matches your TV so as that you can better enjoy your videos. See the User's Guide for your TV if you are not sure about your TV's display format. - Creative ZENV30GBBK | User Guide - Page 19
Zen Vision at a Glance 19 6 Connect your player to a TV with the supplied video cable as shown below. DO NOT use a standard video cable. 1 2 3 4 COMP IN L AUDIO R 5 - Creative ZENV30GBBK | User Guide - Page 20
Zen Vision at a Glance 20 1 A/V Out jack Connect the supplied video cable to this jack on your player. 2 Video In jack Connect the yellow connector on - Creative ZENV30GBBK | User Guide - Page 21
at a Glance 21 Locking Zen Vision Locking Zen Vision disables all the controls on Zen Vision. Lock Zen Vision when you want to prevent buttons from being accidently pressed. To lock Zen Vision Slide the Power switch towards the Lock right-hand corner of the LCD. icon. The Locked icon appears - Creative ZENV30GBBK | User Guide - Page 22
when you set up the Zen Vision software on your computer. In this document, we will use Creative Media Explorer to outline usage instructions. For usage information in Creative Media Explorer, refer to Creative Media Explorer's online Help. Creative Media Explorer Creative Media Explorer offers you - Creative ZENV30GBBK | User Guide - Page 23
, Smart Playlist, CD burning and online music services (available only in certain regions) TIP By default, a window automatically appears at the lower right-hand corner, prompting you to launch Creative MediaSource Player/Organizer, when you connect Zen Vision to your computer. To disable this - Creative ZENV30GBBK | User Guide - Page 24
Updates your music's ID3 tags using the MusicIDSM service from Gracenote® ■ Tag Format Converter Converts non-English ID3 tags for proper display in your player ■ Video Converter Converts unsupported video formats to a format supported by your player, for proper transfer and playback. Depending - Creative ZENV30GBBK | User Guide - Page 25
and Managing Content 25 Transferring and Managing Content About Content Types Creative Zen Vision plays many different types of content, including videos, TV recordings, audio tracks and still photos. You can use Creative Video Converter to convert unsupported video formats to the WMV format - Creative ZENV30GBBK | User Guide - Page 26
Transferring and Managing Content 26 Transferring Content Transferring content from your computer 1 Connect Zen Vision to your computer's USB port with the supplied USB cable. 2 Double-click the My Computer icon on your desktop. 3 Click the Creative Media Explorer icon. - Creative ZENV30GBBK | User Guide - Page 27
the Import Media button and follow the instructions on the screen. 5 To transfer connect your player to your computer, the Creative Zen Vision icon appears under My Computer. Locate your TV recordings must be converted to a supported format using Creative Video Converter. ■ All transferred videos - Creative ZENV30GBBK | User Guide - Page 28
to be viewed on your computer. 1 Insert your memory card into your player's Compact Flash card slot. For more information, see "Inserting a Memory Card" on page 15. 2 In the main , and then click the Creative Zen Vision icon under My Computer. Click Data → Imported Files → . - Creative ZENV30GBBK | User Guide - Page 29
card, Select Append from Compact Flash. NOTE ■ You cannot transfer content from your player to your memory card. ■ Your player only supports memory cards formatted in FAT16 or FAT32 file systems. ■ You can also view transferred photos or videos by Selecting Compact Flash Card → Browse Imported - Creative ZENV30GBBK | User Guide - Page 30
Vision to your computer. 2 Start Sync Manager. You can start Sync Manager in either Creative Media Explorer or Creative MediaSource Player/Organizer. 3 Select My Computer and Zen Vision as the devices you want to synchronize, and then click the Next button. 4 Select the checkboxes that you want, and - Creative ZENV30GBBK | User Guide - Page 31
Transferring and Managing Content 31 Managing Videos To play videos, you must first transfer the videos to your player. For more information, see "Transferring Content" on page 26. The transferred videos are categorized by name, with duration, in your player's Video Library. Use the Play/Pause - Creative ZENV30GBBK | User Guide - Page 32
Transferring and Managing Content 32 Deleting a video 1 In the main menu, Select Videos. 2 Use the navigation buttons to highlight the video that you want to delete. 3 Press the Options button. 4 Select Delete Video. 5 Select Yes. - Creative ZENV30GBBK | User Guide - Page 33
Transferring and Managing Content 33 Managing Photos With Creative Zen Vision's high-capacity storage, you can store thousands of photos in your player, and even set up a slide show, so that you can share memories with friends and family. Photos are categorized by name in Photo Library. Your player - Creative ZENV30GBBK | User Guide - Page 34
Transferring and Managing Content 34 Viewing photo information 1 In the main menu, Select Photos. 2 Select Pictures. 3 Select a photo. 4 Press the Options button. 5 Select View Details. You can see information for that photo displayed on your player's screen. Deleting a photo 1 In the main menu, - Creative ZENV30GBBK | User Guide - Page 35
, artists or genres in your player ■ View track information Modifying or renaming albums, artists or genres, including renaming of audio tracks, can be done in Creative Media Explorer or - Creative ZENV30GBBK | User Guide - Page 36
Transferring and Managing Content 36 Playing a track 1 In the main menu, Select Music Library. 2 Select a category (album, artist, playlist or genre). A list of tracks from the category appear. 3 Select a track. 4 Select Play. Track playback starts. NOTE To search for a track alphabetically, - Creative ZENV30GBBK | User Guide - Page 37
Adding a track to the Now Playing folder 1 In the main menu, Select Music Library. 2 Select a category (album, artist, playlist or genre). A list of tracks in the category appear. 3 Select a track. 4 Press the Options button. 5 Select Add to Selected. Adding a group of tracks to the Now Playing - Creative ZENV30GBBK | User Guide - Page 38
Transferring and Managing Content 38 Creating a playlist Add tracks, artists, albums or genres to a playlist to play back selected tracks in a specific order. You can only create a playlist from tracks in the Now Playing folder. 1 In the main menu, Select Music Library. 2 Select Now Playing. 3 Press - Creative ZENV30GBBK | User Guide - Page 39
Transferring and Managing Content 39 Inserting a bookmark You can insert bookmarks during playback. A bookmark helps you mark a point within a track, so you can return to it at a later time. For example, if you are listening to your recording of an interview, insert a bookmark if you need to stop - Creative ZENV30GBBK | User Guide - Page 40
Select Music Library. 3 Select Bookmarks. 4 In the Bookmarks screen, press the Options 5 Select Clear Bookmark. button. Using Zen Vision's DJ Instead of selecting tracks yourself, you can let Zen Vision's DJ pick out tracks for you. 1 In the main menu, Select Music Library. 2 Select DJ. 3 Select - Creative ZENV30GBBK | User Guide - Page 41
or Down navigation buttons to select a different preset. TIP If you are using the Zen Vision wired remote control, you can press the MODE button to switch between the Now Playing and FM Radio screens. Manually tuning or scanning for a radio station 1 Press the Left or Right navigation button to - Creative ZENV30GBBK | User Guide - Page 42
Transferring and Managing Content 42 Renaming a radio preset 1 In the main menu, Select FM Radio. 2 Select a preset. 3 Press the Options button. 4 Select Name preset. 5 Use the navigation buttons to type a name for your preset. 6 When complete, select OK. Deleting radio presets 1 In the main menu, - Creative ZENV30GBBK | User Guide - Page 43
Transferring and Managing Content 43 Recording With Zen Vision Recording radio broadcasts 1 While listening to a radio broadcast, press the Options Radio to start recording. button and select Record 2 While recording, you can press - Creative ZENV30GBBK | User Guide - Page 44
Transferring and Managing Content 44 Recording with the built-in microphone 1 In the main menu, Select Microphone. 2 Press the Options button and select Start Recording to start recording. 3 While recording, you can press the Options button and select one of the following items: ■ Pause Pauses the - Creative ZENV30GBBK | User Guide - Page 45
play. NOTE You can also press and hold the Play/Pause button to start playing the recording. TIP For a clear recording, make sure you place Zen Vision as close as possible to what you want to record. - Creative ZENV30GBBK | User Guide - Page 46
can start Sync Manager from Creative Media Explorer or Creative MediaSource Player/Organizer. 3 Select My Computer and Zen Vision as the devices you Follow the instructions on the screen. 7 Click the Finish button. NOTE If you do not have Microsoft Outlook installed, you can use Creative Media - Creative ZENV30GBBK | User Guide - Page 47
Using Zen Vision's Organizer Features 47 Viewing the Calendar 1 In the main menu, Select Organizer. 2 Select Calendar. 3 Use the navigation buttons to move between months and days - Creative ZENV30GBBK | User Guide - Page 48
computer's data files, or use it to transfer files from one computer to another. Use Zen Vision as a Removable Disk if you want to use Zen Vision to transfer files between different computers. Using Zen Vision as a Removable Disk 1 In the main menu, Select Extras. 2 Select Removable Disk. When you - Creative ZENV30GBBK | User Guide - Page 49
Storing Data Files in Zen Vision 49 4 Connect Zen Vision to your computer using the supplied USB cable. - Creative ZENV30GBBK | User Guide - Page 50
your player, see "Stopping Zen Vision Properly" on page 52. NOTE ■ Data files saved in the Removable Disk Mode hard disk space cannot be viewed or managed from within Creative Media Explorer. ■ Similarly, data files transferred to Zen Vision using Creative Media Explorer cannot be viewed - Creative ZENV30GBBK | User Guide - Page 51
button and select Format. ■ Go to My Computer if you want to delete individual data files stored in Removable Disk mode. 5 Alternatively, connect Zen Vision to your computer and use Creative Removable Disk Manager to increase or decrease the amount of hard disk space in Removable Disk mode. TIP - Creative ZENV30GBBK | User Guide - Page 52
from the USB port on your computer when transferring files to or from the device, or when files stored in Zen Vision are in use. CAUTION! Only disconnect Zen Vision after the Do not Disconnect message disappears from the LCD. If not, your player may not be able to function normally. Click - Creative ZENV30GBBK | User Guide - Page 53
Adjusting Your Player's Settings 53 Adjusting Your Player's Settings Your player offers you many settings. You can select equalization presets, adjust display settings, enable visual and audio feedback, set the default language or reset your player. Date and Time 1 In the main menu, Select Extras. 2 - Creative ZENV30GBBK | User Guide - Page 54
Adjusting Your Player's Settings 54 Audio Settings You can change Zen Vision's play mode, equalization preset or built-in speaker output from the Audio Settings menu: 1 In the main menu, Select System. 2 Select Audio Settings. Play - Creative ZENV30GBBK | User Guide - Page 55
Adjusting Your Player's Settings 55 Speaker You can enable or disable your player's built-in speaker. Select Off to disable your player's speaker. Select Auto to automatically detect earphones, If no earphones are connected to your player, audio will play back from your player's speaker. 1 Select - Creative ZENV30GBBK | User Guide - Page 56
's Settings 56 Photo and Video Settings You can adjust Zen Vision's slideshow interval and display settings from the Photo/ display format that matches your TV so that you can better enjoy your videos. See the User's Guide for your TV if you are not sure about your TV's display format. 1 In the - Creative ZENV30GBBK | User Guide - Page 57
Adjusting Your Player's Settings 57 Setting Preferences To personalize your player: 1 In the main menu, Select System. 2 Select Player Settings. User Name 1 Select Owner. 2 Use the Navigation buttons to create a user name. Backlight Duration 1 Select Backlight Time. 2 Use the Up or Down navigation - Creative ZENV30GBBK | User Guide - Page 58
Adjusting Your Player's Settings 58 Sleep Timer 1 Select Sleep Timer. 2 Use the Up or Down navigation buttons to increase or decrease the duration you want your player to wait before automatically shutting down. Infrared 1 Select IR Remote. 2 Press the OK button to enable or disable the infrared - Creative ZENV30GBBK | User Guide - Page 59
You can change the default language for your player. 1 In the main menu, Select System. 2 Select Language. 3 Select the default language that you want. Resetting Zen Vision You can reset Zen Vision to its original settings. 1 In the main menu, Select System. 2 Select Reset Settings. 3 Select Yes. - Creative ZENV30GBBK | User Guide - Page 60
your region and then select Support. For the latest firmware updates to improve Zen Vision's functionality, go to www.creative.com and select Downloads. What are the minimum system requirements for setting up Zen Vision's software? ■ Microsoft Windows XP (Service Pack 1 or higher) ■ Intel® Pentium - Creative ZENV30GBBK | User Guide - Page 61
transfer Digital Rights Management (DRM) protected WMA files to my player? Yes. To transfer DRM protected WMA files to Zen Vision, you can use Creative Media Explorer, Creative MediaSource Player/Organizer or WMP 10. Can I use the player for portable data storage? Yes, you can. For more information - Creative ZENV30GBBK | User Guide - Page 62
use at high volumes ■ enabling equalization presets For the latest firmware updates to improve Zen Vision's functionality, go to www.creative.com and select Downloads. How do I reset Zen Vision? 1 Disconnect Zen Vision's power adapter and turn off the power outlet. 2 Remove the battery. 3 Wait five - Creative ZENV30GBBK | User Guide - Page 63
and starts rebuilding Music Library. CAUTION! ■ ■ Selecting Format All clears Zen Vision's memory and erases all hard disk content. Save a copy of your player's you have downloaded a newer firmware version for Zen Vision, or have been advised to do so by the Creative Customer Services center. - Creative ZENV30GBBK | User Guide - Page 64
. ■ Your battery may need to be recharged. Connect your player to the Zen Vision power adapter, and then connect the power adapter to a power outlet. automatically updated? Yes. You can use the Media Sniffer tool in Creative MediaSource Player/Organizer to monitor or 'watch' folders in your computer. - Creative ZENV30GBBK | User Guide - Page 65
you see the PlaysForSure logo, you can be sure that the music bought can be played on your player. Where can I get more information on Creative products? Visit www.creative.com and select your region or country for updates and downloads relating to all - Creative ZENV30GBBK | User Guide - Page 66
information, read the Warranty available with your product. ■ Do not dismantle or attempt to repair your player, battery or power adapter. Refer all servicing to Creative or authorized repair agents. ■ Do not expose your player or battery to temperatures outside the range of 0°C to 45°C (32°F to 113 - Creative ZENV30GBBK | User Guide - Page 67
): IMA ADPCM (16 kHz, Mono) ■ FM Radio: IMA ADPCM (22 kHz, Stereo) FM Radio ■ ■ ■ Stereo and Mono Up to 32 preset stations FM region support International: 87.5 MHz ~ 108.0 MHz, 100 kHz intervals MP3 Playback Performance ■ Signal-to-Noise Ratio: Up to 97 dB ■ Channel Separation: Up to -70 dB - Creative ZENV30GBBK | User Guide - Page 68
25 mW per channel AV OUT jack: PAL or NTSC Compact Flash memory card slot Docking connector USB 2.0 port: Standard USB mini-B receptacle USB display (262,144 colors) Firmware Support ■ Upgradable via USB (firmware upgrades are available from www.creative.com) Earphone Specifications ■ Frequency
-
 1
1 -
 2
2 -
 3
3 -
 4
4 -
 5
5 -
 6
6 -
 7
7 -
8
-
9
-
10
-
11
-
12
-
13
-
14
-
15
-
16
-
17
-
18
-
19
-
20
-
21
-
22
-
23
-
24
-
25
-
26
-
27
-
28
-
29
-
30
-
31
-
32
-
33
-
34
-
35
-
36
-
37
-
38
-
39
-
40
-
41
-
42
-
43
-
44
-
45
-
46
-
47
-
48
-
49
-
50
-
51
-
52
-
53
-
54
-
55
-
56
-
57
-
58
-
59
-
60
-
61
-
62
-
63
-
64
-
65
-
66
-
67
-
68
 |
 |
User's Guide
VISION