D-Link 1824i User Guide - Page 26
Installing the Transceiver Tray
 |
UPC - 790069210358
View all D-Link 1824i manuals
Add to My Manuals
Save this manual to your list of manuals |
Page 26 highlights
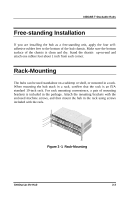
10BASE-T Stackable Hubs Installing the Transceiver Tray At the rear of the hub, there is an AUI connector designed for connecting the hub to various types of Ethernet media such as thick Ethernet coaxial cable (10BASE5), thin Ethernet coax (10BASE2), or fiber optic cabling (10BASEFL). The AUI connector is recessed, allowing most types of transceivers (otherwise known as Media Access Units or MAUs) to be installed partially recessed within the rear panel of the hub. To make inserting and removing the transceiver easier, a transceiver tray has been included with the hub. To install a transceiver using the tray, first place the transceiver in the tray, with the slotted stubs on the transceiver's male AUI connector fitting into the slots on the front of the tray. Open the door covering the AUI port and slide the tray and transceiver into the slot until the connection is secure. Most transceivers should fit within the slot. To accommodate larger transceivers, insert a standard AUI cable using the tray. In this case, the cable serves as a short extension to allow the transceiver to be used external to the hub enclosure. Figure 3 -2 Installing the Transceiver Tray 3-4 Setting Up the Hub
-
 1
1 -
2
-
3
-
4
-
5
-
6
-
7
-
8
-
9
-
10
-
11
-
12
-
13
-
14
-
15
-
16
-
17
-
18
-
19
-
20
-
 21
21 -
 22
22 -
 23
23 -
 24
24 -
 25
25 -
 26
26 -
 27
27 -
 28
28 -
 29
29 -
 30
30 -
 31
31 -
32
-
33
-
34
-
35
-
36
-
37
-
38
-
39
-
40
-
41
-
42
-
43
-
44
-
45
-
46
-
47
-
48
-
49
-
50
-
51
-
52
-
53
-
54
-
55
-
56
-
57
-
58
-
59
-
60
-
61
-
62
-
63
-
64
-
65
-
66
-
67
-
68
-
69
-
70
-
71
-
72
-
73
-
74
-
75
-
76
-
77
-
78
-
79
-
80
-
81
-
82
-
83
-
84
-
85
-
86
-
87
 |
 |
