D-Link 1824i User Guide - Page 61
Controlling Individual Ports
 |
UPC - 790069210358
View all D-Link 1824i manuals
Add to My Manuals
Save this manual to your list of manuals |
Page 61 highlights
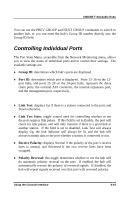
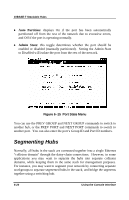
10BASE-T Stackable Hubs You can use the PREV GROUP and NEXT GROUP commands to switch to another hub, or you can enter the hub's Group ID number directly into the Group ID field. Controlling Individual Ports The Port State Menu, accessible from the Network Monitoring menu, allows you to view the status of individual ports and to control their settings. The available settings are: ♦ Group ID: determines which hub's ports are displayed. ♦ Port ID: determines which port is displayed. Ports 13-16 on the 12port hubs, and ports 25-28 on the 24-port hubs, represent the daisy chain ports, the external AUI connector, the internal expansion port, and the management port, respectively. ♦ Link Test: displays Up if there is a station connected to the port, and Down otherwise. ♦ Link Test State: toggle control used for controlling whether or not the port requires link pulses. If this field is set to Enable, the port will check for link pulses, and will only transmit if there is a good link to another station. If the field is set to disabled, Link Test will always display Up, the link indicator will always be lit, and the hub will always transmit data to the port whether a station is connected or not. ♦ Receive Polarity: displays Normal if the polarity of the port's receive lines is normal, and Reversed if the two receive lines have been swapped. ♦ Polarity Reversal: this toggle determines whether or not the hub will do automatic polarity reversal on the port. If enabled, the hub will automatically reverse the polarity of reversed signals. If disabled, the hub will repeat signals received over that port with reversed polarity. Using the Console Interface 6-19
-
 1
1 -
2
-
3
-
4
-
5
-
6
-
7
-
8
-
9
-
10
-
11
-
12
-
13
-
14
-
15
-
16
-
17
-
18
-
19
-
20
-
21
-
22
-
23
-
24
-
25
-
26
-
27
-
28
-
29
-
30
-
31
-
32
-
33
-
34
-
35
-
36
-
37
-
38
-
39
-
40
-
41
-
42
-
43
-
44
-
45
-
46
-
47
-
48
-
49
-
50
-
51
-
52
-
53
-
54
-
55
-
 56
56 -
 57
57 -
 58
58 -
 59
59 -
 60
60 -
 61
61 -
 62
62 -
 63
63 -
 64
64 -
 65
65 -
 66
66 -
67
-
68
-
69
-
70
-
71
-
72
-
73
-
74
-
75
-
76
-
77
-
78
-
79
-
80
-
81
-
82
-
83
-
84
-
85
-
86
-
87
 |
 |
