D-Link DES-3550 Product Manual - Page 197
Secure Shell (SSH), SSH Configuration
 |
UPC - 790069266317
View all D-Link DES-3550 manuals
Add to My Manuals
Save this manual to your list of manuals |
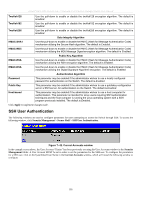
Page 197 highlights
xStack® DES-3500 Series Layer 2 Stackable Fast Ethernet Managed Switch User Manual NOTE: Enabling the SSL command will disable the web-based switch management. To log on to the Switch again, the header of the URL must begin with https://. Entering anything else into the address field of the web browser will result in an error and no authentication will be granted. Secure Shell (SSH) SSH is an abbreviation of Secure Shell, which is a program allowing secure remote login and secure network services over an insecure network. It allows a secure login to remote host computers, a safe method of executing commands on a remote end node, and will provide secure encrypted and authenticated communication between two non-trusted hosts. SSH, with its array of unmatched security features is an essential tool in today's networking environment. It is a powerful guardian against numerous existing security hazards that now threaten network communications. The steps required to use the SSH protocol for secure communication between a remote PC (the SSH client) and the Switch (the SSH server) are as follows: 1. Create a user account with admin-level access using the User Accounts window in the Security Management folder. This is identical to creating any other admin-level User Account on the Switch, including specifying a password. This password is used to logon to the Switch, once a secure communication path has been established using the SSH protocol. 2. Configure the User Account to use a specified authorization method to identify users that are allowed to establish SSH connections with the Switch using the SSH User Authentication window. There are three choices as to the method SSH will use to authorize the user, which are Host Based, Password and Public Key. 3. Configure the encryption algorithm that SSH will use to encrypt and decrypt messages sent between the SSH client and the SSH server, using the SSH Algorithm window. 4. Finally, enable SSH on the Switch using the SSH Configuration window. After completing the preceding steps, a SSH Client on a remote PC can be configured to manage the Switch using a secure, in band connection. SSH Configuration The following window is used to configure and view settings for the SSH server and can be opened by clicking Security Management > Secure Shell (SSH) > SSH Configuration: 182
-
 1
1 -
2
-
3
-
4
-
5
-
6
-
7
-
8
-
9
-
10
-
11
-
12
-
13
-
14
-
15
-
16
-
17
-
18
-
19
-
20
-
21
-
22
-
23
-
24
-
25
-
26
-
27
-
28
-
29
-
30
-
31
-
32
-
33
-
34
-
35
-
36
-
37
-
38
-
39
-
40
-
41
-
42
-
43
-
44
-
45
-
46
-
47
-
48
-
49
-
50
-
51
-
52
-
53
-
54
-
55
-
56
-
57
-
58
-
59
-
60
-
61
-
62
-
63
-
64
-
65
-
66
-
67
-
68
-
69
-
70
-
71
-
72
-
73
-
74
-
75
-
76
-
77
-
78
-
79
-
80
-
81
-
82
-
83
-
84
-
85
-
86
-
87
-
88
-
89
-
90
-
91
-
92
-
93
-
94
-
95
-
96
-
97
-
98
-
99
-
100
-
101
-
102
-
103
-
104
-
105
-
106
-
107
-
108
-
109
-
110
-
111
-
112
-
113
-
114
-
115
-
116
-
117
-
118
-
119
-
120
-
121
-
122
-
123
-
124
-
125
-
126
-
127
-
128
-
129
-
130
-
131
-
132
-
133
-
134
-
135
-
136
-
137
-
138
-
139
-
140
-
141
-
142
-
143
-
144
-
145
-
146
-
147
-
148
-
149
-
150
-
151
-
152
-
153
-
154
-
155
-
156
-
157
-
158
-
159
-
160
-
161
-
162
-
163
-
164
-
165
-
166
-
167
-
168
-
169
-
170
-
171
-
172
-
173
-
174
-
175
-
176
-
177
-
178
-
179
-
180
-
181
-
182
-
183
-
184
-
185
-
186
-
187
-
188
-
189
-
190
-
191
-
 192
192 -
 193
193 -
 194
194 -
 195
195 -
 196
196 -
 197
197 -
 198
198 -
 199
199 -
 200
200 -
 201
201 -
 202
202 -
203
-
204
-
205
-
206
-
207
-
208
-
209
-
210
-
211
-
212
-
213
-
214
-
215
-
216
-
217
-
218
-
219
-
220
-
221
-
222
-
223
-
224
-
225
-
226
-
227
-
228
-
229
-
230
-
231
-
232
-
233
-
234
-
235
-
236
-
237
-
238
-
239
-
240
-
241
-
242
-
243
-
244
-
245
-
246
-
247
-
248
-
249
-
250
-
251
-
252
-
253
-
254
-
255
-
256
-
257
-
258
-
259
-
260
-
261
-
262
-
263
-
264
-
265
-
266
-
267
-
268
-
269
-
270
-
271
-
272
-
273
-
274
-
275
-
276
-
277
-
278
-
279
-
280
-
281
-
282
-
283
-
284
-
285
-
286
-
287
-
288
-
289
-
290
-
291
-
292
-
293
-
294
-
295
-
296
-
297
-
298
-
299
-
300
-
301
-
302
-
303
-
304
-
305
-
306
-
307
-
308
-
309
-
310
-
311
-
312
-
313
-
314
-
315
-
316
-
317
-
318
-
319
-
320
-
321
-
322
-
323
-
324
-
325
-
326
-
327
-
328
 |
 |
