D-Link DIR-842 User Manual - Page 18
configuration utility. Click, prompted for this password every time you want to use the router's web
 |
View all D-Link DIR-842 manuals
Add to My Manuals
Save this manual to your list of manuals |
Page 18 highlights
Section 3 - Getting Started For both the 2.4 GHz and 5 GHz segments, create a Wi-Fi network name (SSID) using up to 32 characters. Create a Wi-Fi password (between 8-63 characters). Your wireless clients will need to have this passphrase or key entered to be able to connect to your wireless network. Click Next to continue. In order to secure the router, please enter a new password. You will be prompted for this password every time you want to use the router's web configuration utility. Click Next to continue. The Summary window will display your settings. Click Next if you are satisfied, or click Back to make changes to them. D-Link DIR-842 User Manual 14
-
 1
1 -
2
-
3
-
4
-
5
-
6
-
7
-
8
-
9
-
10
-
11
-
12
-
 13
13 -
 14
14 -
 15
15 -
 16
16 -
 17
17 -
 18
18 -
 19
19 -
 20
20 -
 21
21 -
 22
22 -
 23
23 -
24
-
25
-
26
-
27
-
28
-
29
-
30
-
31
-
32
-
33
-
34
-
35
-
36
-
37
-
38
-
39
-
40
-
41
-
42
-
43
-
44
-
45
-
46
-
47
-
48
-
49
-
50
-
51
-
52
-
53
-
54
-
55
-
56
-
57
-
58
-
59
-
60
-
61
-
62
-
63
-
64
-
65
-
66
-
67
-
68
-
69
-
70
-
71
-
72
-
73
-
74
-
75
-
76
-
77
-
78
-
79
-
80
-
81
-
82
-
83
-
84
-
85
-
86
-
87
-
88
-
89
-
90
-
91
-
92
-
93
-
94
-
95
-
96
-
97
-
98
-
99
-
100
-
101
-
102
-
103
 |
 |
14
D-Link DIR-842 User Manual
Section 3 - Getting Started
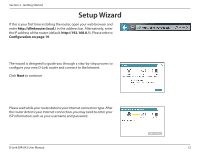
For both the 2.4 GHz and 5 GHz segments, create a Wi-Fi network name
(SSID) using up to 32 characters.
Create a Wi-Fi password (between 8-63 characters).
Your wireless clients
will need to have this passphrase or key entered to be able to connect
to your wireless network.
Click
Next
to continue.
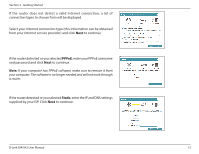
In order to secure the router, please enter a new password. You will be
prompted for this password every time you want to use the router’s web
configuration utility. Click
Next
to continue.
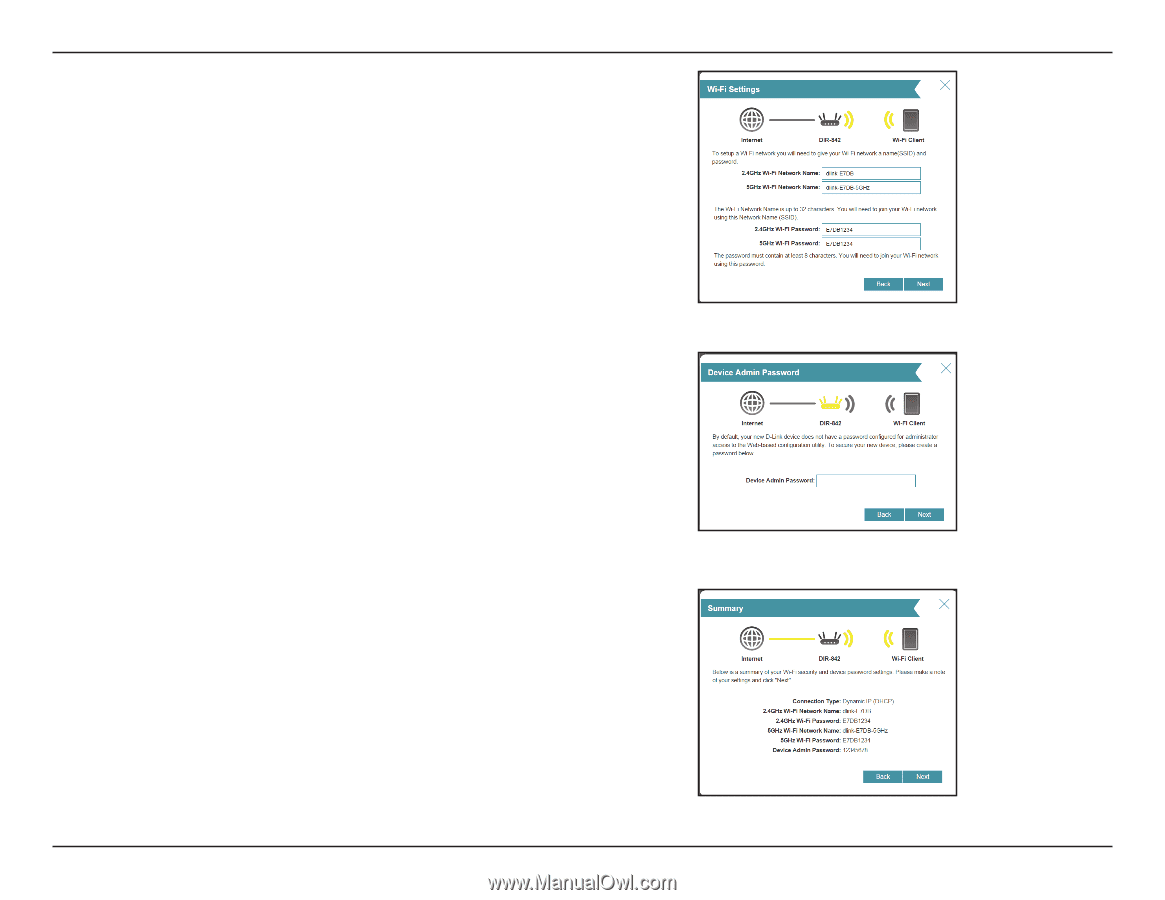
The Summary window will display your settings. Click
Next
if you are
satisfied, or click
Back
to make changes to them.