Dell 1450 Dell Projector 1220/ Users Guide - Page 29
to zoom and view the image., Adjust the image scale by pressing - laptop
 |
View all Dell 1450 manuals
Add to My Manuals
Save this manual to your list of manuals |
Page 29 highlights
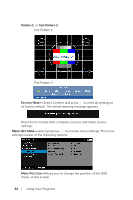
HORIZONTAL POSITION-Press to move the image right and to move the image left. VERTICAL POSITION-Press the image down. to move the image up and to move FREQUENCY-Allows you to change the display data clock frequency to match the frequency of your computer's graphics card. If you see a vertical flickering wave, use the Frequency control to minimize the bars. This is a coarse adjustment. TRACKING-Synchronize the phase of the display signal with the graphic card. If you experience an unstable or flickering image, use Tracking to correct it. This is a fine adjustment. ASPECT RATIO-Allows you to select the aspect ratio to adjust how the image appears. Options are: Origin, 16:10, 16:9, and 4:3. •Origin - Select Origin to maintain the aspect ratio of the image projector according to the input source. •16:10 - The input source scales to fit the width of the screen to project a 16:10 screen image. •16:9 - The input source scales to fit the width of the screen to project a 16:9 screen image. •4:3 - The input source scales to fit the screen and projects a 4:3 image. ZOOM-Press and to zoom and view the image. Adjust the image scale by pressing or and press to view on your remote control only. ZOOM NAVIGATION-Press to activate the Zoom Navigation menu. Use screen. to navigate the projection 3D DISPLAY-Select On to activate the 3D display function (default is Off). NOTE: 1 When you want to create a 3D experience, you will need a few other components including: a Computer/Laptop with a 120 Hz signal output quad- buffered graphics card. Using Your Projector 29
-
 1
1 -
2
-
3
-
4
-
5
-
6
-
7
-
8
-
9
-
10
-
11
-
12
-
13
-
14
-
15
-
16
-
17
-
18
-
19
-
20
-
21
-
22
-
23
-
 24
24 -
 25
25 -
 26
26 -
 27
27 -
 28
28 -
 29
29 -
 30
30 -
 31
31 -
 32
32 -
 33
33 -
 34
34 -
35
-
36
-
37
-
38
-
39
-
40
-
41
-
42
-
43
-
44
-
45
-
46
-
47
-
48
-
49
-
50
-
51
-
52
-
53
-
54
-
55
-
56
 |
 |
