Dell 1600n Multifunction Mono Laser Printer Dell Laser Multi-Function Printer - Page 79
Open and close the front cover to resume printing.
 |
View all Dell 1600n Multifunction Mono Laser Printer manuals
Add to My Manuals
Save this manual to your list of manuals |
Page 79 highlights
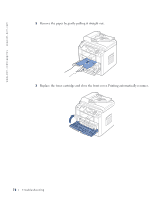
3 Remove the paper by gently pulling it straight out. If you cannot see the paper or the paper does not move when pulled, check the fuser area. For more information, see page 71. 4 Insert the paper tray into the multi-function printer until it snaps into place. 5 Open and close the front cover to resume printing. Troubleshooting 69
-
 1
1 -
2
-
3
-
4
-
5
-
6
-
7
-
8
-
9
-
10
-
11
-
12
-
13
-
14
-
15
-
16
-
17
-
18
-
19
-
20
-
21
-
22
-
23
-
24
-
25
-
26
-
27
-
28
-
29
-
30
-
31
-
32
-
33
-
34
-
35
-
36
-
37
-
38
-
39
-
40
-
41
-
42
-
43
-
44
-
45
-
46
-
47
-
48
-
49
-
50
-
51
-
52
-
53
-
54
-
55
-
56
-
57
-
58
-
59
-
60
-
61
-
62
-
63
-
64
-
65
-
66
-
67
-
68
-
69
-
70
-
71
-
72
-
73
-
 74
74 -
 75
75 -
 76
76 -
 77
77 -
 78
78 -
 79
79 -
 80
80 -
 81
81 -
 82
82 -
 83
83 -
 84
84 -
85
-
86
-
87
-
88
-
89
-
90
-
91
-
92
-
93
-
94
-
95
-
96
-
97
-
98
-
99
-
100
-
101
-
102
-
103
-
104
-
105
-
106
-
107
-
108
-
109
-
110
-
111
-
112
-
113
-
114
-
115
-
116
-
117
-
118
-
119
-
120
-
121
-
122
-
123
-
124
-
125
-
126
-
127
-
128
-
129
-
130
-
131
-
132
-
133
-
134
 |
 |

Troubleshooting
69
3
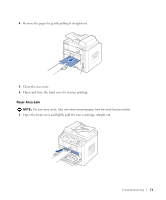
Remove the paper by gently pulling it straight out.
If you cannot see the paper or the paper does not move when pulled,
check the fuser
area. For more information, see page 71.
4
Insert the paper tray into the multi-function printer until it snaps into place.
5
Open and close the front cover to resume printing.