Dell 1600n Multifunction Mono Laser Printer Dell Laser Multi-Function Printer - Page 84
More Troubleshooting, Tips for Avoiding Paper Jams
 |
View all Dell 1600n Multifunction Mono Laser Printer manuals
Add to My Manuals
Save this manual to your list of manuals |
Page 84 highlights
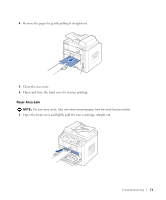
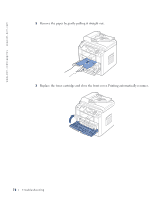
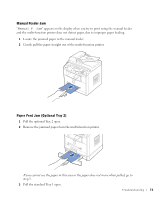
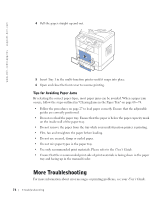
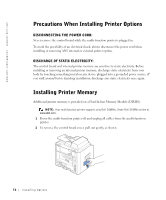
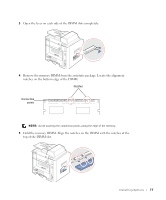
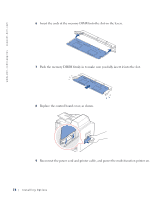
www.dell.com/supplies | support.dell.com 4 Pull the paper straight up and out. 5 Insert Tray 1 in the multi-function printer until it snaps into place. 6 Open and close the front cover to resume printing. Tips for Avoiding Paper Jams By selecting the correct paper types, most paper jams can be avoided. When a paper jam occurs, follow the steps outlined in "Clearing Jams in the Paper Tray" on page 68~74. • Follow the procedures on page 27 to load paper correctly. Ensure that the adjustable guides are correctly positioned. • Do not overload the paper tray. Ensure that the paper is below the paper capacity mark on the inside wall of the paper tray. • Do not remove the paper from the tray while your multi-function printer is printing. • Flex, fan and straighten the paper before loading. • Do not use creased, damp or curled paper. • Do not mix paper types in the paper tray. • Use only recommended print materials. Please refer to the User's Guide. • Ensure that the recommended print side of print materials is facing down in the paper tray and facing up in the manual feeder. More Troubleshooting For more information about error messages or printing problems, see your User's Guide. 74 Troubleshooting
-
 1
1 -
2
-
3
-
4
-
5
-
6
-
7
-
8
-
9
-
10
-
11
-
12
-
13
-
14
-
15
-
16
-
17
-
18
-
19
-
20
-
21
-
22
-
23
-
24
-
25
-
26
-
27
-
28
-
29
-
30
-
31
-
32
-
33
-
34
-
35
-
36
-
37
-
38
-
39
-
40
-
41
-
42
-
43
-
44
-
45
-
46
-
47
-
48
-
49
-
50
-
51
-
52
-
53
-
54
-
55
-
56
-
57
-
58
-
59
-
60
-
61
-
62
-
63
-
64
-
65
-
66
-
67
-
68
-
69
-
70
-
71
-
72
-
73
-
74
-
75
-
76
-
77
-
78
-
 79
79 -
 80
80 -
 81
81 -
 82
82 -
 83
83 -
 84
84 -
 85
85 -
 86
86 -
 87
87 -
 88
88 -
 89
89 -
90
-
91
-
92
-
93
-
94
-
95
-
96
-
97
-
98
-
99
-
100
-
101
-
102
-
103
-
104
-
105
-
106
-
107
-
108
-
109
-
110
-
111
-
112
-
113
-
114
-
115
-
116
-
117
-
118
-
119
-
120
-
121
-
122
-
123
-
124
-
125
-
126
-
127
-
128
-
129
-
130
-
131
-
132
-
133
-
134
 |
 |
