Dell 1720 User's Guide (HTML) - Page 16
Printing Multiple Images on One N-Up Printing, Dell Laser Printer 1720 - Manual Duplex - 1720dn laser printer
 |
UPC - 884116025122
View all Dell 1720 manuals
Add to My Manuals
Save this manual to your list of manuals |
Page 16 highlights
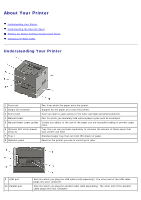
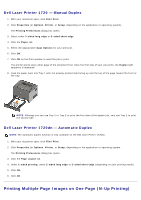
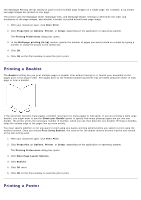
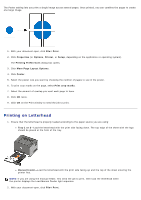
Dell Laser Printer 1720 - Manual Duplex 1. With your document open, click File® Print. 2. Click Properties (or Options, Printer, or Setup, depending on the application or operating system). The Printing Preferences dialog box opens. 3. Select either 2-sided long edge or 2-sided short edge. 4. Click the Paper tab. 5. Select the appropriate Input Options for your print job. 6. Click OK. 7. Click OK on the Print window to send the job to print. The printer prints every other page of the document first. Once the first side of your job prints, the Duplex light sequence is displayed. 8. Load the paper back into Tray 1 with the already-printed side facing up and the top of the page toward the front of the tray. NOTE: Although you can use Tray 1 or Tray 2 to print the first side of the duplex job, only use Tray 1 to print the second side. Dell Laser Printer 1720dn - Automatic Duplex NOTE: The automatic duplex function is only available on the Dell Laser Printer 1720dn. 1. With your document open, click File® Print. 2. Click Properties (or Options, Printer, or Setup, depending on the application or operating system. The Printing Preferences dialog box opens. 3. Click the Page Layout tab. 4. Under 2-sided printing, select 2-sided long edge or 2-sided short edge (depending on your printing needs). 5. Click OK. 6. Click OK. Printing Multiple Page Images on One Page (N-Up Printing)
-
 1
1 -
2
-
3
-
4
-
5
-
6
-
7
-
8
-
9
-
10
-
 11
11 -
 12
12 -
 13
13 -
 14
14 -
 15
15 -
 16
16 -
 17
17 -
 18
18 -
 19
19 -
 20
20 -
 21
21 -
22
-
23
-
24
-
25
-
26
-
27
-
28
-
29
-
30
-
31
-
32
-
33
-
34
-
35
-
36
-
37
-
38
-
39
-
40
-
41
-
42
-
43
-
44
-
45
-
46
-
47
-
48
-
49
-
50
-
51
-
52
-
53
-
54
-
55
-
56
-
57
-
58
-
59
-
60
-
61
-
62
-
63
-
64
-
65
-
66
-
67
-
68
-
69
-
70
-
71
-
72
-
73
-
74
-
75
-
76
-
77
-
78
-
79
-
80
-
81
-
82
-
83
-
84
-
85
-
86
-
87
-
88
 |
 |