Dell 1720 User's Guide (HTML) - Page 54
Installing an Optional Memory Card, Dell Laser Printer 1720dn - Attached to a Network
 |
UPC - 884116025122
View all Dell 1720 manuals
Add to My Manuals
Save this manual to your list of manuals |
Page 54 highlights
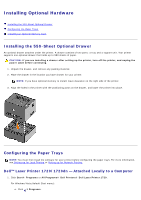
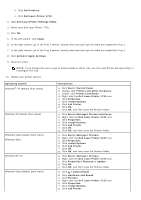
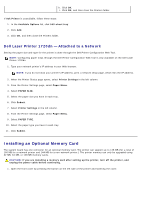
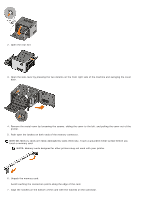
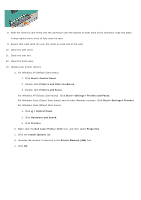
h. Click OK. i. Click OK, and then close the Printers folder. If Ask Printer is unavailable, follow these steps: 1. In the Available Options list, click 550-sheet tray. 2. Click Add. 3. Click OK, and then close the Printers folder. Dell Laser Printer 1720dn - Attached to a Network Setting the paper size and type for the printer is done through the Dell Printer Configuration Web Tool. NOTE: Configuring paper trays through the Dell Printer Configuration Web Tool is only available on the Dell Laser Printer 1720dn. 1. Type your network printer's IP address in your Web browser. NOTE: If you do not know your printer's IP address, print a network setup page, which lists the IP address. 2. When the Printer Status page opens, select Printer Settings in the left column. 3. From the Printer Settings page, select Paper Menu. 4. Select PAPER SIZE. 5. Select the paper size you have in each tray. 6. Click Submit. 7. Select Printer Settings in the left column. 8. From the Printer Settings page, select Paper Menu. 9. Select PAPER TYPE. 10. Select the paper type you have in each tray. 11. Click Submit. Installing an Optional Memory Card The system board has one connector for an optional memory card. The printer can support up to 128 MB (for a total of 160 MB for a network printer and 144 MB for a non-network printer.) The printer memory can only be upgraded using 32 MB, 64 MB, or 128 MB memory cards. CAUTION: If you are installing a memory card after setting up the printer, turn off the printer, and unplug the power cable before continuing. 1. Open the front cover by pressing the button on the left side of the printer and lowering the cover.
-
 1
1 -
2
-
3
-
4
-
5
-
6
-
7
-
8
-
9
-
10
-
11
-
12
-
13
-
14
-
15
-
16
-
17
-
18
-
19
-
20
-
21
-
22
-
23
-
24
-
25
-
26
-
27
-
28
-
29
-
30
-
31
-
32
-
33
-
34
-
35
-
36
-
37
-
38
-
39
-
40
-
41
-
42
-
43
-
44
-
45
-
46
-
47
-
48
-
 49
49 -
 50
50 -
 51
51 -
 52
52 -
 53
53 -
 54
54 -
 55
55 -
 56
56 -
 57
57 -
 58
58 -
 59
59 -
60
-
61
-
62
-
63
-
64
-
65
-
66
-
67
-
68
-
69
-
70
-
71
-
72
-
73
-
74
-
75
-
76
-
77
-
78
-
79
-
80
-
81
-
82
-
83
-
84
-
85
-
86
-
87
-
88
 |
 |