Dell 1720 User's Guide (HTML) - Page 67
Setting up for Local Printing, Windows - printer driver windows xp
 |
UPC - 884116025122
View all Dell 1720 manuals
Add to My Manuals
Save this manual to your list of manuals |
Page 67 highlights
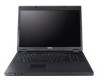
Setting up for Local Printing Windows® Macintosh Linux Windows® Some Windows operating systems may already include a printer driver that is compatible with the printer. NOTE: Installing custom drivers do not replace the system driver. A separate printer object is created and appears in the Printers folder. Operating System: Windows Vista™ Windows XP Windows Server 2003 Windows 2000 Windows NT Use this type of cable: USB or Parallel Parallel Installing the Printer Drivers NOTE: Windows Vista, Windows XP Professional, Windows NT, Windows Server 2003, and Windows 2000 require that you have administrative access to install printer drivers on your computer. 1. Insert the Drivers and Utilities CD. The Drivers and Utilities CD launches the installation software automatically. 2. When the Drivers and Utilities CD screen appears, click Personal Installation - Install the printer for use on this computer only, and then click Next. 3. Select your printer from the drop-down menu. 4. Select Typical Installation (recommended), and then click Install. 5. Click Finish, connect the printer to the computer using a USB or parallel cable, and turn on the printer. Microsoft's Plug and Play finishes installing the printer and prompts you when setup is completed. Installing Additional Printer Drivers 1. Turn on your computer, and insert the Drivers and Utilities CD. When the Drivers and Utilities CD launches, click Cancel. 2. For Windows XP (default Start menu): a. Click Start® Control Panel.
-
 1
1 -
2
-
3
-
4
-
5
-
6
-
7
-
8
-
9
-
10
-
11
-
12
-
13
-
14
-
15
-
16
-
17
-
18
-
19
-
20
-
21
-
22
-
23
-
24
-
25
-
26
-
27
-
28
-
29
-
30
-
31
-
32
-
33
-
34
-
35
-
36
-
37
-
38
-
39
-
40
-
41
-
42
-
43
-
44
-
45
-
46
-
47
-
48
-
49
-
50
-
51
-
52
-
53
-
54
-
55
-
56
-
57
-
58
-
59
-
60
-
61
-
 62
62 -
 63
63 -
 64
64 -
 65
65 -
 66
66 -
 67
67 -
 68
68 -
 69
69 -
 70
70 -
 71
71 -
 72
72 -
73
-
74
-
75
-
76
-
77
-
78
-
79
-
80
-
81
-
82
-
83
-
84
-
85
-
86
-
87
-
88
 |
 |