Dell 3100cn Color Laser Printer User's Guide - Page 148
Turn On the Printer, Print and Check the Printer Settings Assign an IP Address
 |
View all Dell 3100cn Color Laser Printer manuals
Add to My Manuals
Save this manual to your list of manuals |
Page 148 highlights
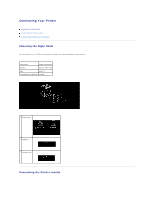
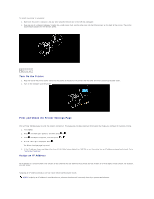
To attach the printer to a network: 1. Make sure the printer, computer, and any other attached devices are turned off and unplugged. 2. Plug one end of a standard category 5 cable into a LAN drop or hub, and the other end into the Ethernet port on the back of the printer. The printer automatically adjusts for the network speed. 1 Ethernet port Turn On the Printer 1. Plug one end of the printer power cable into the socket at the back of the printer and the other end into a properly grounded outlet. 2. Turn on the computer and the printer. Print and Check the Printer Settings Page Print a Printer Settings page to verify the network connection. This page also provides important information that helps you configure for network printing. 1. Press Menu. 2. Press until Configure appears, and then press or . 3. Press until Reports appears, and then press or . 4. Printer Settings is displayed. Press . The Printer Settings page is printed. 5. If the IP address shows anything other than 0.0.0.0 (the factory default) or 169.254.xx.xx, the printer has an IP address assigned and stored. Go to "Verify the IP Settings." Assign an IP Address An IP address is a unique number that consists of four sections that are delimited by a period and can include up to three digits in each section, for example, 111.222.33.44. Assigning an IP address already in use can cause network performance issues. NOTE: Assigning an IP address is considered as an advanced function and is normally done by a system administrator.
-
 1
1 -
2
-
3
-
4
-
5
-
6
-
7
-
8
-
9
-
10
-
11
-
12
-
13
-
14
-
15
-
16
-
17
-
18
-
19
-
20
-
21
-
22
-
23
-
24
-
25
-
26
-
27
-
28
-
29
-
30
-
31
-
32
-
33
-
34
-
35
-
36
-
37
-
38
-
39
-
40
-
41
-
42
-
43
-
44
-
45
-
46
-
47
-
48
-
49
-
50
-
51
-
52
-
53
-
54
-
55
-
56
-
57
-
58
-
59
-
60
-
61
-
62
-
63
-
64
-
65
-
66
-
67
-
68
-
69
-
70
-
71
-
72
-
73
-
74
-
75
-
76
-
77
-
78
-
79
-
80
-
81
-
82
-
83
-
84
-
85
-
86
-
87
-
88
-
89
-
90
-
91
-
92
-
93
-
94
-
95
-
96
-
97
-
98
-
99
-
100
-
101
-
102
-
103
-
104
-
105
-
106
-
107
-
108
-
109
-
110
-
111
-
112
-
113
-
114
-
115
-
116
-
117
-
118
-
119
-
120
-
121
-
122
-
123
-
124
-
125
-
126
-
127
-
128
-
129
-
130
-
131
-
132
-
133
-
134
-
135
-
136
-
137
-
138
-
139
-
140
-
141
-
142
-
 143
143 -
 144
144 -
 145
145 -
 146
146 -
 147
147 -
 148
148 -
 149
149 -
 150
150 -
 151
151 -
 152
152 -
 153
153 -
154
-
155
-
156
-
157
-
158
-
159
-
160
-
161
-
162
-
163
-
164
-
165
-
166
-
167
-
168
-
169
-
170
-
171
-
172
-
173
-
174
-
175
-
176
-
177
-
178
-
179
-
180
-
181
-
182
-
183
-
184
-
185
-
186
-
187
-
188
-
189
-
190
-
191
-
192
-
193
-
194
-
195
-
196
-
197
-
198
-
199
-
200
-
201
-
202
-
203
-
204
-
205
-
206
-
207
-
208
-
209
-
210
-
211
-
212
-
213
-
214
-
215
-
216
-
217
-
218
-
219
 |
 |
