Dell 5110cn Color Laser Printer Service Manual - Page 369
Hook One End Of Spring No Paper Msi To Multipurpose Feeder Mpf Actuator
 |
View all Dell 5110cn Color Laser Printer manuals
Add to My Manuals
Save this manual to your list of manuals |
Page 369 highlights
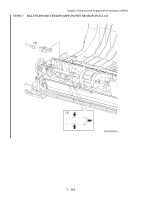
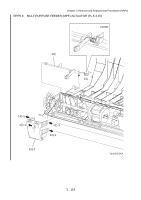
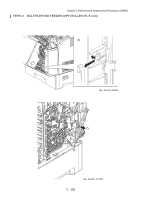
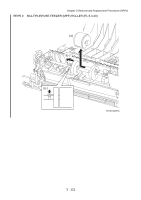
Chapter 3 Removal and Replacement Procedures (RRPs) RRP5.8 MULTIPURPOSE FEEDER (MPF) ACTUATOR (PL.5.3.15) [Removal] 1) Remove FUSER. (RRP5.1) 2) Remove TRANSFER ROLLER. (RRP5.2) 3) Remove TOP COVER FRAME. (RRP1.1) 4) Remove FRONT COVER. (RRP1.3) 5) Remove RIGHT FRONT COVER. (RRP1.8) 6) Remove LEFT FRONT COVER. (RRP1.11) 7) Remove RIGHT SIDE COVER. (RRP1.7) 8) Remove LEFT SIDE COVER. (RRP1.12) 9) Remove COVER ASSY REAR. (RRP1.5) 10) Remove MULTIPURPOSE FEEDER (MPF) TRAY. (RRP1.9) 11) Remove OUTER DUPLEX ASSEMBLY. (RRP5.18) 12) Release the four hooks that fix CHUTE FEED UP to OUTER DUPLEX ASSEMBLY, remove CHUTE FEED UP. 13) Remove ACTUAOR NO PAPER MSI from the notch of the hole which fixes MULTIPURPOSE FEEDER (MPF) ACTUATOR to OUTER DUPLEX ASSEMBLY, and pull out MULTIPURPOSE FEEDER (MPF) ACTUATOR from the other attaching hole to remove together with SPRING NO PAPER MSI. 14) Remove SPRING NO PAPER MSI from ACTUAOR NO PAPER MSI. [Replacement] • There shall be no mistake in attaching orientation of SPRING. • SPRING shall be securely hooked without fail. 1) Attach SPRING NO PAPER MSI to MULTIPURPOSE FEEDER (MPF) ACTUATOR. 2) Insert one end the MULTIPURPOSE FEEDER (MPF) ACTUATOR into the hole on the side face of the OUTER DUPLEX ASSEMBLY. Insert the other end of the MULTIPURPOSE FEEDER (MPF) ACTUATOR into the other notch and attach it. 3) Hook one end of SPRING NO PAPER MSI to MULTIPURPOSE FEEDER (MPF) ACTUATOR and the other end to OUTER DUPLEX ASSEMBLY. 4) Attach CHUTE FEED UP to OUTER DUPLEX ASSEMBLY, fix it using the four hooks. 5) Attach OUTER DUPLEX ASSEMBLY. (RRP5.18) 6) Attach MULTIPURPOSE FEEDER (MPF) COVER. (RRP1.10) 7) Attach MULTIPURPOSE FEEDER (MPF) TRAY. (RRP1.9) 8) Attach COVER ASSY REAR. (RRP1.5) 9) Attach LEFT SIDE COVER. (RRP1.12) 10) Attach RIGHT SIDE COVER. (RRP1.7) 11) Attach LEFT FRONT COVER. (RRP1.11) 12) Attach RIGHT FRONT COVER. (RRP1.8) 13) Attach FRONT COVER. (RRP1.3) 14) Attach TOP COVER FRAME. (RRP1.1) 15) Attach TRANSFER ROLLER. (RRP5.2) 16) Attach FUSER. (RRP5.1) 3 - 119
-
 1
1 -
2
-
3
-
4
-
5
-
6
-
7
-
8
-
9
-
10
-
11
-
12
-
13
-
14
-
15
-
16
-
17
-
18
-
19
-
20
-
21
-
22
-
23
-
24
-
25
-
26
-
27
-
28
-
29
-
30
-
31
-
32
-
33
-
34
-
35
-
36
-
37
-
38
-
39
-
40
-
41
-
42
-
43
-
44
-
45
-
46
-
47
-
48
-
49
-
50
-
51
-
52
-
53
-
54
-
55
-
56
-
57
-
58
-
59
-
60
-
61
-
62
-
63
-
64
-
65
-
66
-
67
-
68
-
69
-
70
-
71
-
72
-
73
-
74
-
75
-
76
-
77
-
78
-
79
-
80
-
81
-
82
-
83
-
84
-
85
-
86
-
87
-
88
-
89
-
90
-
91
-
92
-
93
-
94
-
95
-
96
-
97
-
98
-
99
-
100
-
101
-
102
-
103
-
104
-
105
-
106
-
107
-
108
-
109
-
110
-
111
-
112
-
113
-
114
-
115
-
116
-
117
-
118
-
119
-
120
-
121
-
122
-
123
-
124
-
125
-
126
-
127
-
128
-
129
-
130
-
131
-
132
-
133
-
134
-
135
-
136
-
137
-
138
-
139
-
140
-
141
-
142
-
143
-
144
-
145
-
146
-
147
-
148
-
149
-
150
-
151
-
152
-
153
-
154
-
155
-
156
-
157
-
158
-
159
-
160
-
161
-
162
-
163
-
164
-
165
-
166
-
167
-
168
-
169
-
170
-
171
-
172
-
173
-
174
-
175
-
176
-
177
-
178
-
179
-
180
-
181
-
182
-
183
-
184
-
185
-
186
-
187
-
188
-
189
-
190
-
191
-
192
-
193
-
194
-
195
-
196
-
197
-
198
-
199
-
200
-
201
-
202
-
203
-
204
-
205
-
206
-
207
-
208
-
209
-
210
-
211
-
212
-
213
-
214
-
215
-
216
-
217
-
218
-
219
-
220
-
221
-
222
-
223
-
224
-
225
-
226
-
227
-
228
-
229
-
230
-
231
-
232
-
233
-
234
-
235
-
236
-
237
-
238
-
239
-
240
-
241
-
242
-
243
-
244
-
245
-
246
-
247
-
248
-
249
-
250
-
251
-
252
-
253
-
254
-
255
-
256
-
257
-
258
-
259
-
260
-
261
-
262
-
263
-
264
-
265
-
266
-
267
-
268
-
269
-
270
-
271
-
272
-
273
-
274
-
275
-
276
-
277
-
278
-
279
-
280
-
281
-
282
-
283
-
284
-
285
-
286
-
287
-
288
-
289
-
290
-
291
-
292
-
293
-
294
-
295
-
296
-
297
-
298
-
299
-
300
-
301
-
302
-
303
-
304
-
305
-
306
-
307
-
308
-
309
-
310
-
311
-
312
-
313
-
314
-
315
-
316
-
317
-
318
-
319
-
320
-
321
-
322
-
323
-
324
-
325
-
326
-
327
-
328
-
329
-
330
-
331
-
332
-
333
-
334
-
335
-
336
-
337
-
338
-
339
-
340
-
341
-
342
-
343
-
344
-
345
-
346
-
347
-
348
-
349
-
350
-
351
-
352
-
353
-
354
-
355
-
356
-
357
-
358
-
359
-
360
-
361
-
362
-
363
-
 364
364 -
 365
365 -
 366
366 -
 367
367 -
 368
368 -
 369
369 -
 370
370 -
 371
371 -
 372
372 -
 373
373 -
 374
374 -
375
-
376
-
377
-
378
-
379
-
380
-
381
-
382
-
383
-
384
-
385
-
386
-
387
-
388
-
389
-
390
-
391
-
392
-
393
-
394
-
395
-
396
-
397
-
398
-
399
-
400
-
401
-
402
-
403
-
404
-
405
-
406
-
407
-
408
-
409
-
410
-
411
-
412
-
413
-
414
-
415
-
416
-
417
-
418
-
419
-
420
-
421
-
422
-
423
-
424
-
425
-
426
-
427
-
428
-
429
-
430
-
431
-
432
-
433
-
434
-
435
-
436
-
437
-
438
-
439
-
440
-
441
-
442
-
443
-
444
-
445
-
446
-
447
-
448
-
449
-
450
-
451
-
452
-
453
-
454
-
455
-
456
-
457
-
458
-
459
-
460
-
461
-
462
-
463
-
464
-
465
-
466
-
467
-
468
-
469
-
470
-
471
-
472
-
473
-
474
-
475
-
476
-
477
-
478
-
479
-
480
-
481
-
482
-
483
-
484
-
485
-
486
-
487
-
488
-
489
-
490
-
491
-
492
-
493
-
494
-
495
-
496
-
497
-
498
-
499
-
500
-
501
-
502
-
503
-
504
-
505
-
506
-
507
-
508
-
509
-
510
-
511
-
512
-
513
-
514
-
515
-
516
-
517
-
518
-
519
-
520
-
521
-
522
-
523
-
524
-
525
-
526
-
527
-
528
-
529
-
530
-
531
-
532
-
533
-
534
-
535
-
536
-
537
-
538
-
539
-
540
-
541
-
542
-
543
-
544
-
545
-
546
-
547
-
548
-
549
-
550
-
551
-
552
-
553
-
554
-
555
-
556
-
557
-
558
-
559
-
560
-
561
-
562
-
563
-
564
-
565
-
566
-
567
-
568
-
569
-
570
-
571
-
572
-
573
-
574
-
575
-
576
-
577
-
578
-
579
-
580
-
581
-
582
-
583
-
584
-
585
-
586
-
587
-
588
-
589
-
590
-
591
-
592
-
593
-
594
-
595
-
596
-
597
-
598
-
599
-
600
-
601
-
602
-
603
-
604
-
605
-
606
-
607
-
608
-
609
-
610
-
611
-
612
-
613
-
614
-
615
-
616
-
617
-
618
-
619
-
620
-
621
-
622
-
623
-
624
-
625
-
626
-
627
-
628
-
629
-
630
-
631
-
632
-
633
-
634
-
635
-
636
-
637
-
638
-
639
-
640
-
641
-
642
 |
 |
