Dell 5110cn Color Laser Printer Service Manual - Page 392
Remove the connector P/J36, P/J52 that is connected to MACHINE CONTROL UNIT MCU
 |
View all Dell 5110cn Color Laser Printer manuals
Add to My Manuals
Save this manual to your list of manuals |
Page 392 highlights
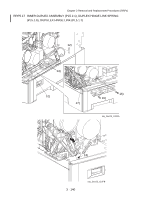
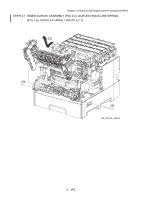
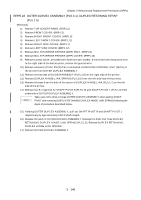
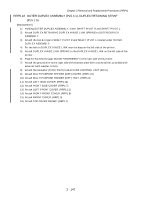
Chapter 3 Removal and Replacement Procedures (RRPs) RRP5.17 INNER DUPLEX ASSEMBLY (PL5.2.1), DUPLEX HINGE LINK SPRING (PL5.1.6), DUPULEX HINGE LINK (PL5.1.7) [Removal] 1) Remove TOP COVER FRAME. (RRP1.1) 2) Remove FRONT COVER. (RRP1.3) 3) Remove RIGHT FRONT COVER. (RRP1.8) 4) Remove LEFT FRONT COVER. (RRP1.11) 5) Remove RIGHT SIDE COVER. (RRP1.7) 6) Remove LEFT SIDE COVER. (RRP1.12) 7) Remove MULTIPURPOSE FEEDER (MPF) TRAY. (RRP1.9) 8) Remove MULTIPURPOSE FEEDER (MPF) COVER. (RRP1.10) 9) Remove OUTER DUPLEX ASSEMBLY. (RRP5.18) 10) Remove a screw (silver, provided with external tooth washer, 5 mm) that fixes the ground wire on the right side of the bottom plate, remove the ground wire. 11) Remove connector (P/J162) that is connected to LOW VOLTAGE POWER SUPPLY (LVPS) from INNER DUPLEX ASSEMBLY. 12) Remove one CLAMP GUIDE HARNESS from GUIDE HARNESS R (PL.9.1.14) on the right side of the printer. 13) Remove the harness from GUIDE HARNESS R on the right side of the printer. 14) Remove the connector (P/J36, P/J52) that is connected to MACHINE CONTROL UNIT (MCU) from INNER DUPLEX ASSEMBLY. 15) Remove the harness from GUIDE HARNESS F on the right side of the printer. 16) Remove two screws (silver, tap, 10 mm) that fixes GUIDE HARNESS F to the right side of the printer, remove GUIDE HARNESS F. 17) Remove the harness from the harness guide mounted in the clearance between the right side of the printer and the bottom plate. 18) Remove DUPLEX HINGE LINK SPRING (PL5.1.6) from the right side of the printer. 19) Remove the boss from the hole in the center of the DUPLEX HINGE LINK (PL5.1.7) on the right side of the printer. Take care not to drop or break INNER DUPLEX ASSEMBLY when pulling out SHAFT PIVOT following the steps of procedure described below. 20) Holding INNER DUPLEX ASSEMBLY, pull out SHAFT PIVOT R and SHAFT PIVOT L. 21) Release the latch of INNER DUPLEX ASSEMBLY, then remove INNER DUPLEX ASSEMBLY. 3 - 142
-
 1
1 -
2
-
3
-
4
-
5
-
6
-
7
-
8
-
9
-
10
-
11
-
12
-
13
-
14
-
15
-
16
-
17
-
18
-
19
-
20
-
21
-
22
-
23
-
24
-
25
-
26
-
27
-
28
-
29
-
30
-
31
-
32
-
33
-
34
-
35
-
36
-
37
-
38
-
39
-
40
-
41
-
42
-
43
-
44
-
45
-
46
-
47
-
48
-
49
-
50
-
51
-
52
-
53
-
54
-
55
-
56
-
57
-
58
-
59
-
60
-
61
-
62
-
63
-
64
-
65
-
66
-
67
-
68
-
69
-
70
-
71
-
72
-
73
-
74
-
75
-
76
-
77
-
78
-
79
-
80
-
81
-
82
-
83
-
84
-
85
-
86
-
87
-
88
-
89
-
90
-
91
-
92
-
93
-
94
-
95
-
96
-
97
-
98
-
99
-
100
-
101
-
102
-
103
-
104
-
105
-
106
-
107
-
108
-
109
-
110
-
111
-
112
-
113
-
114
-
115
-
116
-
117
-
118
-
119
-
120
-
121
-
122
-
123
-
124
-
125
-
126
-
127
-
128
-
129
-
130
-
131
-
132
-
133
-
134
-
135
-
136
-
137
-
138
-
139
-
140
-
141
-
142
-
143
-
144
-
145
-
146
-
147
-
148
-
149
-
150
-
151
-
152
-
153
-
154
-
155
-
156
-
157
-
158
-
159
-
160
-
161
-
162
-
163
-
164
-
165
-
166
-
167
-
168
-
169
-
170
-
171
-
172
-
173
-
174
-
175
-
176
-
177
-
178
-
179
-
180
-
181
-
182
-
183
-
184
-
185
-
186
-
187
-
188
-
189
-
190
-
191
-
192
-
193
-
194
-
195
-
196
-
197
-
198
-
199
-
200
-
201
-
202
-
203
-
204
-
205
-
206
-
207
-
208
-
209
-
210
-
211
-
212
-
213
-
214
-
215
-
216
-
217
-
218
-
219
-
220
-
221
-
222
-
223
-
224
-
225
-
226
-
227
-
228
-
229
-
230
-
231
-
232
-
233
-
234
-
235
-
236
-
237
-
238
-
239
-
240
-
241
-
242
-
243
-
244
-
245
-
246
-
247
-
248
-
249
-
250
-
251
-
252
-
253
-
254
-
255
-
256
-
257
-
258
-
259
-
260
-
261
-
262
-
263
-
264
-
265
-
266
-
267
-
268
-
269
-
270
-
271
-
272
-
273
-
274
-
275
-
276
-
277
-
278
-
279
-
280
-
281
-
282
-
283
-
284
-
285
-
286
-
287
-
288
-
289
-
290
-
291
-
292
-
293
-
294
-
295
-
296
-
297
-
298
-
299
-
300
-
301
-
302
-
303
-
304
-
305
-
306
-
307
-
308
-
309
-
310
-
311
-
312
-
313
-
314
-
315
-
316
-
317
-
318
-
319
-
320
-
321
-
322
-
323
-
324
-
325
-
326
-
327
-
328
-
329
-
330
-
331
-
332
-
333
-
334
-
335
-
336
-
337
-
338
-
339
-
340
-
341
-
342
-
343
-
344
-
345
-
346
-
347
-
348
-
349
-
350
-
351
-
352
-
353
-
354
-
355
-
356
-
357
-
358
-
359
-
360
-
361
-
362
-
363
-
364
-
365
-
366
-
367
-
368
-
369
-
370
-
371
-
372
-
373
-
374
-
375
-
376
-
377
-
378
-
379
-
380
-
381
-
382
-
383
-
384
-
385
-
386
-
 387
387 -
 388
388 -
 389
389 -
 390
390 -
 391
391 -
 392
392 -
 393
393 -
 394
394 -
 395
395 -
 396
396 -
 397
397 -
398
-
399
-
400
-
401
-
402
-
403
-
404
-
405
-
406
-
407
-
408
-
409
-
410
-
411
-
412
-
413
-
414
-
415
-
416
-
417
-
418
-
419
-
420
-
421
-
422
-
423
-
424
-
425
-
426
-
427
-
428
-
429
-
430
-
431
-
432
-
433
-
434
-
435
-
436
-
437
-
438
-
439
-
440
-
441
-
442
-
443
-
444
-
445
-
446
-
447
-
448
-
449
-
450
-
451
-
452
-
453
-
454
-
455
-
456
-
457
-
458
-
459
-
460
-
461
-
462
-
463
-
464
-
465
-
466
-
467
-
468
-
469
-
470
-
471
-
472
-
473
-
474
-
475
-
476
-
477
-
478
-
479
-
480
-
481
-
482
-
483
-
484
-
485
-
486
-
487
-
488
-
489
-
490
-
491
-
492
-
493
-
494
-
495
-
496
-
497
-
498
-
499
-
500
-
501
-
502
-
503
-
504
-
505
-
506
-
507
-
508
-
509
-
510
-
511
-
512
-
513
-
514
-
515
-
516
-
517
-
518
-
519
-
520
-
521
-
522
-
523
-
524
-
525
-
526
-
527
-
528
-
529
-
530
-
531
-
532
-
533
-
534
-
535
-
536
-
537
-
538
-
539
-
540
-
541
-
542
-
543
-
544
-
545
-
546
-
547
-
548
-
549
-
550
-
551
-
552
-
553
-
554
-
555
-
556
-
557
-
558
-
559
-
560
-
561
-
562
-
563
-
564
-
565
-
566
-
567
-
568
-
569
-
570
-
571
-
572
-
573
-
574
-
575
-
576
-
577
-
578
-
579
-
580
-
581
-
582
-
583
-
584
-
585
-
586
-
587
-
588
-
589
-
590
-
591
-
592
-
593
-
594
-
595
-
596
-
597
-
598
-
599
-
600
-
601
-
602
-
603
-
604
-
605
-
606
-
607
-
608
-
609
-
610
-
611
-
612
-
613
-
614
-
615
-
616
-
617
-
618
-
619
-
620
-
621
-
622
-
623
-
624
-
625
-
626
-
627
-
628
-
629
-
630
-
631
-
632
-
633
-
634
-
635
-
636
-
637
-
638
-
639
-
640
-
641
-
642
 |
 |