Dell Force10 Z9000 Installing the Z9000 System - Page 29
Replace a Power Supply
 |
View all Dell Force10 Z9000 manuals
Add to My Manuals
Save this manual to your list of manuals |
Page 29 highlights
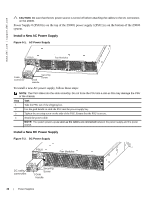
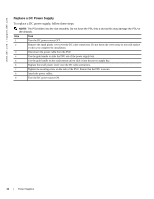
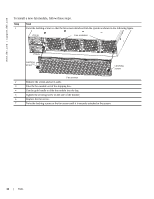
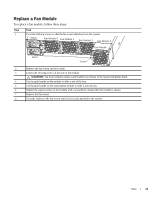
To install a new DC power supply, follow these steps: NOTE: The PSU slides into the slot smoothly. Do not force the PSU into a slot as this may damage the PSU or the chassis Step Task 1 Take the PSU out of the shipping box. 2 Remove the small plastic cover over the DC cable connectors. Do not throw the cover away as you will replace it when you complete the installation. 3 Ensure that the DC power source is turned OFF. 4 Use the grab handle to slide the PSU into the power supply bay. 5 Tighten the securing screw on the side of the PSU. Ensure that the PSU is secure. 6 Attach the power cables. 7 Replace the small plastic cover over the DC cable connectors. 8 Turn the DC power source ON. Replace a Power Supply NOTE: If a PSU fails, it must be completely replaced. There are no field servicable components in the PSU. For help replacing a PSU, refer to Requesting a Hardware Replacement. NOTE: If you use a single PSU, you must install a blank plate in the other PSU slot. Dell Force10 recommends using power supply 1 (PSU1) as the blank plate slot. Replace an AC Power Supply To replace an AC PSU, follow these steps: NOTE: The PSU slides into the slot smoothly. Do not force the PSU into a slot as this may damage the PSU or the chassis. Step Task 1 Disconnect the power cable from the PSU. 2 Use the grab handle to slide the PSU out of the power supply bay. 3 Use the grab handle on the replacement unit to slide it into the power supply bay. 4 Tighten the securing screw on the side of the PSU. Ensure that the PSU is secure. 5 Attach power cable. NOTE: The system powers up as soon as the cables are connected between the power supply and the power source. Power Supplies | 29
-
 1
1 -
2
-
3
-
4
-
5
-
6
-
7
-
8
-
9
-
10
-
11
-
12
-
13
-
14
-
15
-
16
-
17
-
18
-
19
-
20
-
21
-
22
-
23
-
 24
24 -
 25
25 -
 26
26 -
 27
27 -
 28
28 -
 29
29 -
 30
30 -
 31
31 -
 32
32 -
 33
33 -
 34
34 -
35
-
36
-
37
-
38
-
39
-
40
-
41
-
42
-
43
-
44
-
45
-
46
-
47
-
48
-
49
-
50
-
51
-
52
-
53
-
54
-
55
-
56
 |
 |