Dell Latitude 3190 Owners Manual - Page 53
System setup options, Boot Sequence, Navigation keys
 |
View all Dell Latitude 3190 manuals
Add to My Manuals
Save this manual to your list of manuals |
Page 53 highlights
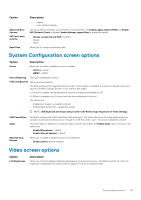
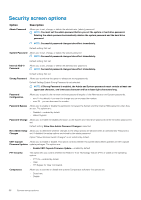
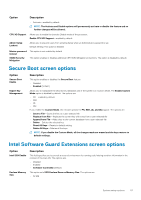
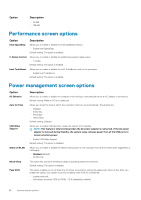
6 System setup options NOTE: Depending on the computer and its installed devices, the items listed in this section may or may not appear. Topics: • Boot Sequence • Navigation keys • System Setup overview • Accessing System Setup • General screen options • System Configuration screen options • Video screen options • Security screen options • Secure Boot screen options • Intel Software Guard Extensions screen options • Performance screen options • Power management screen options • POST behavior screen options • Virtualization support screen options • Wireless screen options • Maintenance screen options • System logs screen options • SupportAssist system resolution • Updating the BIOS in Windows • System and setup password Boot Sequence Boot sequence enables you to bypass the System Setup-defined boot device order and boot directly to a specific device (for example: optical drive or hard drive). During the Power-on Self-Test (POST), when the Dell logo appears, you can: • Access System Setup by pressing F2 key • Bring up the one-time boot menu by pressing F12 key. The one-time boot menu displays the devices that you can boot from including the diagnostic option. The boot menu options are: • Removable Drive (if available) • STXXXX Drive NOTE: XXXX denotes the SATA drive number. • Optical Drive (if available) • SATA Hard Drive (if available) • Diagnostics NOTE: Choosing Diagnostics, displays the ePSA diagnostics screen. The boot sequence screen also displays the option to access the System Setup screen. Navigation keys NOTE: For most of the System Setup options, changes that you make are recorded but do not take effect until you restart the system. System setup options 53
-
 1
1 -
2
-
3
-
4
-
5
-
6
-
7
-
8
-
9
-
10
-
11
-
12
-
13
-
14
-
15
-
16
-
17
-
18
-
19
-
20
-
21
-
22
-
23
-
24
-
25
-
26
-
27
-
28
-
29
-
30
-
31
-
32
-
33
-
34
-
35
-
36
-
37
-
38
-
39
-
40
-
41
-
42
-
43
-
44
-
45
-
46
-
47
-
 48
48 -
 49
49 -
 50
50 -
 51
51 -
 52
52 -
 53
53 -
 54
54 -
 55
55 -
 56
56 -
 57
57 -
 58
58 -
59
-
60
-
61
-
62
-
63
-
64
-
65
 |
 |