Dell Latitude CPi Service Manual - Page 54
raise up slightly.
 |
View all Dell Latitude CPi manuals
Add to My Manuals
Save this manual to your list of manuals |
Page 54 highlights
To remove the keyboard assembly, follow these steps: 12-mm screws (6) a. Carefully deflect the palmrest (next to the blank key below the key) away from the center of the keyboard, until the tab on the palmrest's inner edge disengages from the keyboard. The keyboard should raise up slightly. b. Insert a fingernail or a small flat-bladed screwdriver under the scalloped edge of the blank key (see Figure 4-10), and lift the right edge of the keyboard. 4-18 Dell Latitude CP and CPi Service Manual
-
 1
1 -
2
-
3
-
4
-
5
-
6
-
7
-
8
-
9
-
10
-
11
-
12
-
13
-
14
-
15
-
16
-
17
-
18
-
19
-
20
-
21
-
22
-
23
-
24
-
25
-
26
-
27
-
28
-
29
-
30
-
31
-
32
-
33
-
34
-
35
-
36
-
37
-
38
-
39
-
40
-
41
-
42
-
43
-
44
-
45
-
46
-
47
-
48
-
 49
49 -
 50
50 -
 51
51 -
 52
52 -
 53
53 -
 54
54 -
 55
55 -
 56
56 -
 57
57 -
 58
58 -
 59
59 -
60
-
61
-
62
-
63
-
64
-
65
-
66
-
67
-
68
-
69
-
70
-
71
-
72
-
73
-
74
-
75
-
76
-
77
-
78
-
79
-
80
-
81
-
82
-
83
-
84
-
85
-
86
-
87
-
88
-
89
-
90
-
91
-
92
-
93
 |
 |
4-18
Dell Latitude CP and CPi Service Manual
.H\ERDUG±$VVHPEO\±
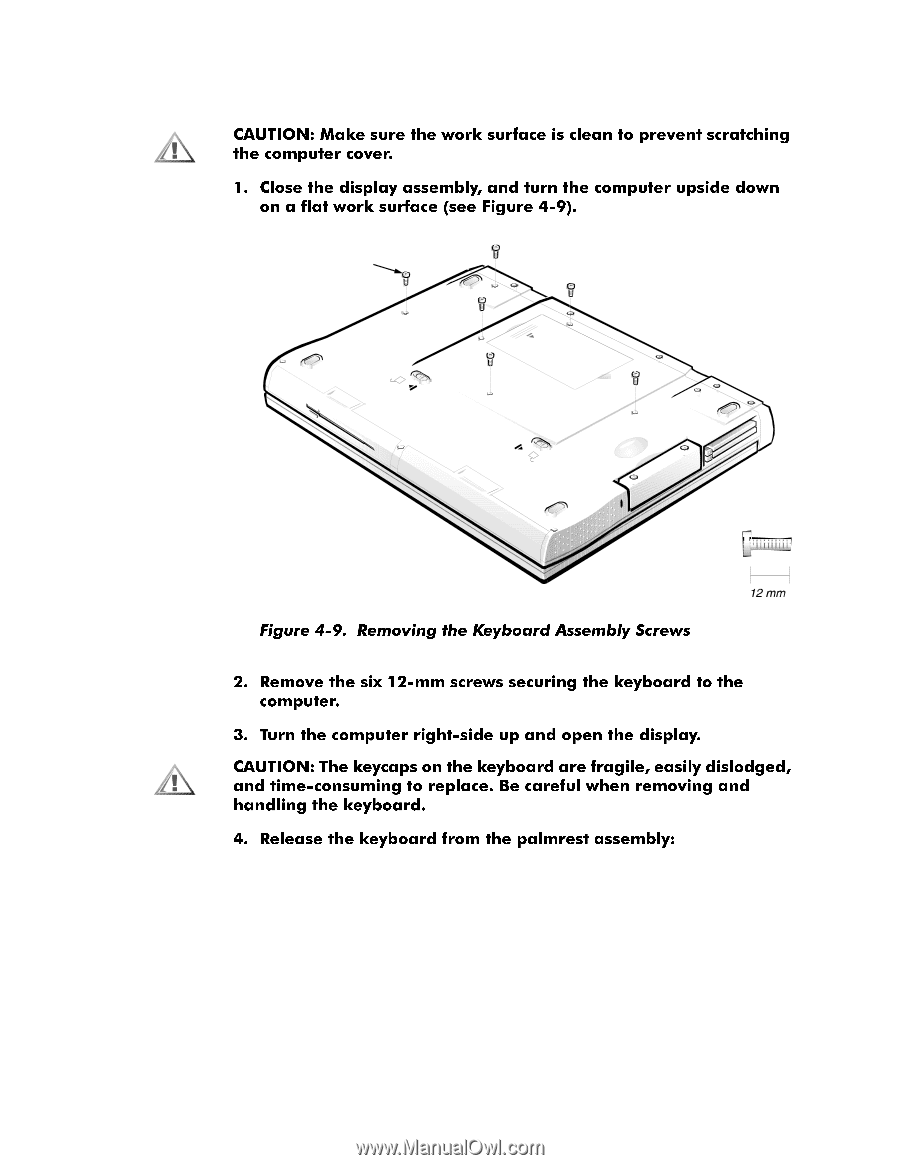
To remove the keyboard assembly, follow these steps:
a.
Carefully deflect the palmrest (next to the blank key below the <Shift>
key) away from the center of the keyboard, until the tab on the palm-
rest’s inner edge disengages from the keyboard. The keyboard should
raise up slightly.
b.
Insert a fingernail or a small flat-bladed screwdriver under the scalloped
edge of the blank key (see Figure 4-10), and lift the right edge of the
keyboard.
12-mm screws (6)