Dell OptiPlex 960 Setup and Quick Reference Guide - Page 49
Dell Technical Update Service, Dell Diagnostics, When the DELL - windows 7 drivers
 |
View all Dell OptiPlex 960 manuals
Add to My Manuals
Save this manual to your list of manuals |
Page 49 highlights
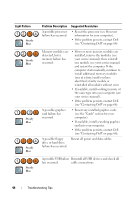
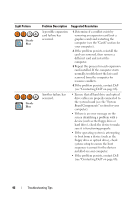
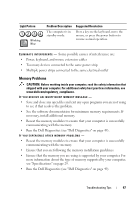
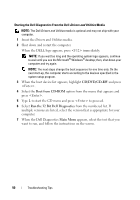
Other software problems CHECK THE SOFTWARE DOCUMENTATION OR CONTACT THE SOFTWARE MANUFACTURER FOR TROUBLESHOOTING INFORMATION - • Ensure that the program is compatible with the operating system installed on your computer. • Ensure that your computer meets the minimum hardware requirements needed to run the software. See the software documentation for information. • Ensure that the program is installed and configured properly. • Verify that the device drivers do not conflict with the program. • If necessary, uninstall and then reinstall the program. Dell Technical Update Service The Dell Technical Update service provides proactive e-mail notification of software and hardware updates for your computer. To enroll for the Dell Technical Update service, go to support.dell.com/technicalupdate. Dell Diagnostics CAUTION: Before you begin any of the procedures in this section, follow the safety instructions that shipped with your computer. Starting the Dell Diagnostics From Your Hard Drive 1 Ensure that the computer is connected to a working electrical outlet. 2 Turn on (or restart) your computer. 3 When the DELL™ logo appears, press immediately. Select Diagnostics from the start menu and press . NOTE: If you wait too long and the operating system logo appears, continue to wait until you see the Microsoft® Windows® desktop, and then shut down your computer and try again. NOTE: If you see a message stating that no diagnostics utility partition has been found, run the Dell Diagnostics from the Drivers and Utilities media. 4 Press any key to start the Dell Diagnostics from the diagnostics utility partition on your hard drive, and follow the instructions on the screen. Troubleshooting Tips 49
-
 1
1 -
2
-
3
-
4
-
5
-
6
-
7
-
8
-
9
-
10
-
11
-
12
-
13
-
14
-
15
-
16
-
17
-
18
-
19
-
20
-
21
-
22
-
23
-
24
-
25
-
26
-
27
-
28
-
29
-
30
-
31
-
32
-
33
-
34
-
35
-
36
-
37
-
38
-
39
-
40
-
41
-
42
-
43
-
 44
44 -
 45
45 -
 46
46 -
 47
47 -
 48
48 -
 49
49 -
 50
50 -
 51
51 -
 52
52 -
 53
53 -
 54
54 -
55
-
56
-
57
-
58
-
59
-
60
-
61
-
62
-
63
-
64
-
65
-
66
-
67
-
68
-
69
-
70
 |
 |