Dell OptiPlex GXi Reference and Installation Guide ( - Page 76
Updating the NIC Daughter Board, Removing the NIC Daughter, Board
 |
View all Dell OptiPlex GXi manuals
Add to My Manuals
Save this manual to your list of manuals |
Page 76 highlights
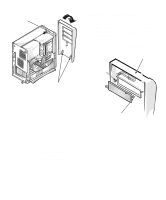
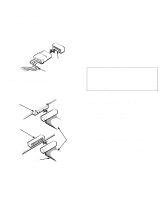
12. If necessary, change the microprocessor speed jumper setting (see Figure 5-6 to locate the system board jumpers). The microprocessor speed jumper should be set for the installed microprocessor's rated internal speed. For example, for a 166-megahertz (MHz) Intel Pentium processor, a jumper plug should be installed on the pins labeled "166." (See Table 5-1 for more information.) 13. Replace the computer cover, reconnect your computer and peripherals to their power sources, and turn them on. As the system boots, it detects the presence of the new microprocessor and automatically changes the system configuration information in the System Setup program. 14. Enter the System Setup program, and confirm that the Microprocessor category correctly identifies the installed microprocessor. See Chapter 2, "Using the System Setup Program." 15. Run the Dell diagnostics to verify that the new microprocessor is operating correctly. See your Diagnostics and Troubleshooting Guide for information on running the diskette-based diagnostics and troubleshooting any problems that may occur. Updating the NIC Daughter Board To update the system's 100Base-TX or 100Base-T4 NIC daughter board with the alternative NIC daughter board, you must replace the NIC daughter board and configure the NIC, as described in the following procedure: 1. Remove the computer cover according to the instructions in "Removing the Computer Cover" in Chapter 5. 2. Remove the mounting screw for the NIC daughter board from the back of the computer. 3. Pull the NIC daughter board straight out from the system board (see Figure 6-14). T4 designation Figure 6-14. Removing the NIC Daughter Board 4. Insert the new NIC daughter board into the NIC daughter board connector. 5. Insert and tighten the mounting screw for the NIC daughter board. 6. Replace the computer cover according to the instructions in "Replacing the Computer Cover" in Chapter 5. 7. Restart the system in MS-DOS safe mode. 8. Insert the NIC drivers diskette 1 (diskette 2 for a system running the Windows 95 operating system) into drive A, type a:\niccfg.exe, and then press . The system detects and configures the new NIC daughter board. 9. Reinstall the NIC driver. For installation instructions, see "Configuring the NIC" in Chapter 4. 6-10 Dell OptiPlex GXi Mini Tower Systems Reference and Installation Guide
-
 1
1 -
2
-
3
-
4
-
5
-
6
-
7
-
8
-
9
-
10
-
11
-
12
-
13
-
14
-
15
-
16
-
17
-
18
-
19
-
20
-
21
-
22
-
23
-
24
-
25
-
26
-
27
-
28
-
29
-
30
-
31
-
32
-
33
-
34
-
35
-
36
-
37
-
38
-
39
-
40
-
41
-
42
-
43
-
44
-
45
-
46
-
47
-
48
-
49
-
50
-
51
-
52
-
53
-
54
-
55
-
56
-
57
-
58
-
59
-
60
-
61
-
62
-
63
-
64
-
65
-
66
-
67
-
68
-
69
-
70
-
 71
71 -
 72
72 -
 73
73 -
 74
74 -
 75
75 -
 76
76 -
 77
77 -
 78
78 -
 79
79 -
 80
80 -
 81
81 -
82
-
83
-
84
-
85
-
86
-
87
-
88
-
89
-
90
-
91
-
92
-
93
-
94
-
95
-
96
-
97
-
98
-
99
-
100
-
101
-
102
-
103
-
104
-
105
-
106
-
107
-
108
-
109
-
110
-
111
-
112
-
113
-
114
-
115
-
116
-
117
-
118
-
119
-
120
-
121
-
122
-
123
-
124
-
125
-
126
 |
 |
