Dell OptiPlex GXi Reference and Installation Guide ( - Page 77
Replacing the System Battery, Using the System Setup Program,
 |
View all Dell OptiPlex GXi manuals
Add to My Manuals
Save this manual to your list of manuals |
Page 77 highlights
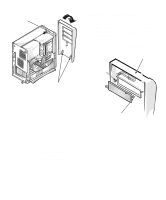
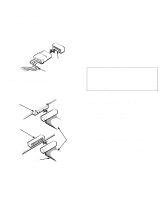
Replacing the System Battery A 3.0-volt (V) CR2032 coin-cell battery installed on the system board maintains system configuration, date, and time information in a special section of memory. The operating life of the battery can extend up to ten years. The battery may need replacing if an incorrect time or date is displayed during the boot routine along with a message such as: Time-of-day not set - please run SETUP program or Invalid configuration information - please run SETUP program or Strike the F1 key to continue, F2 to run the setup utility To determine whether the battery needs replacing, reenter the time and date through the System Setup program (not through the MS-DOS time and date commands) and exit the program properly to save the information (see Chapter 2, "Using the System Setup Program," for instructions). Turn off and disconnect your system from alternating current (AC) power for a few hours; then reconnect and turn on your system. Enter the System Setup program. If the date and time are not correct in the System Setup program, replace your battery. You can operate your system without a battery; however, without a battery, the system configuration information is erased if the system is turned off or unplugged from AC power. In this case, you must enter the System Setup program and reset the configuration options. WARNING: There is a danger of the new battery exploding if it is incorrectly installed. Replace the battery only with the same or equivalent type recommended by the manufacturer. Discard used batteries according to the manufacturer's instructions. Use the following procedure to replace the system battery with another CR2032 coin-cell battery: 1. If you have not already done so, make a copy of your system configuration information in the System Setup program. If the settings are lost while you are replacing the battery, refer to your written or printed copy of the system configuration information to restore the correct settings. See Chapter 2, "Using the System Setup Program," for instructions. 2. Remove the computer cover according to the instructions in "Removing the Computer Cover" in Chapter 5. CAUTION: See "Protecting Against Electrostatic Discharge" in the safety instructions at the front of this guide. 3. To access the battery on the system board, remove the expansion-card cage as described in "Removing the Expansion-Card Cage" in Chapter 5. 4. Locate the battery and remove it. The battery (see Figure 6-1) is mounted in a socket labeled "BATTERY" on the left side of the system board (as you face the side of the system). CAUTION: If you pry the battery out of its socket with a blunt object, be careful not to touch the system board with the object. Make certain that the object is inserted between the battery and the socket before attempting to pry out the battery. Otherwise, you may damage the system board by prying off the socket or by breaking circuit traces on the system board. Pry the battery out of its socket with your fingers or with a blunt, nonconductive object, such as a plastic screwdriver. Installing System Board Options 6-11
-
 1
1 -
2
-
3
-
4
-
5
-
6
-
7
-
8
-
9
-
10
-
11
-
12
-
13
-
14
-
15
-
16
-
17
-
18
-
19
-
20
-
21
-
22
-
23
-
24
-
25
-
26
-
27
-
28
-
29
-
30
-
31
-
32
-
33
-
34
-
35
-
36
-
37
-
38
-
39
-
40
-
41
-
42
-
43
-
44
-
45
-
46
-
47
-
48
-
49
-
50
-
51
-
52
-
53
-
54
-
55
-
56
-
57
-
58
-
59
-
60
-
61
-
62
-
63
-
64
-
65
-
66
-
67
-
68
-
69
-
70
-
71
-
 72
72 -
 73
73 -
 74
74 -
 75
75 -
 76
76 -
 77
77 -
 78
78 -
 79
79 -
 80
80 -
 81
81 -
 82
82 -
83
-
84
-
85
-
86
-
87
-
88
-
89
-
90
-
91
-
92
-
93
-
94
-
95
-
96
-
97
-
98
-
99
-
100
-
101
-
102
-
103
-
104
-
105
-
106
-
107
-
108
-
109
-
110
-
111
-
112
-
113
-
114
-
115
-
116
-
117
-
118
-
119
-
120
-
121
-
122
-
123
-
124
-
125
-
126
 |
 |
