Dell OptiPlex GXi Reference and Installation Guide ( - Page 80
Removing and Replacing Front-Panel Inserts, Removing the Front Bezel
 |
View all Dell OptiPlex GXi manuals
Add to My Manuals
Save this manual to your list of manuals |
Page 80 highlights
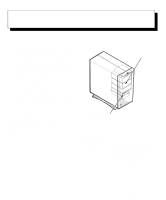
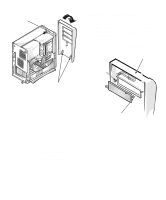
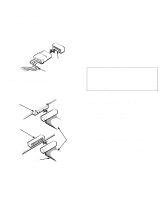
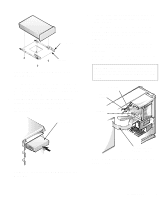
tab release To remove the insert covering a 5.25-inch bay, follow these steps: 1. Remove the computer cover as instructed in "Removing the Computer Cover" in Chapter 5. 2. Remove the front bezel using the instructions in the previous section, "Removing and Replacing the Front Bezel." 3. Holding the bezel with the front facing you, use your thumbs to press in each end of the insert until it snaps free of the bezel (see Figure 7-3). computer cover posts (2) retaining hooks Figure 7-2. Removing the Front Bezel While pressing the tab release, tilt the bezel away from the chassis, disengage the two retaining hooks at the bottom of the bezel, and carefully pull the bezel away from the chassis. To replace the bezel, fit the two retaining hooks on the bezel into their corresponding slots at the bottom of the chassis. Then rotate the top of the bezel toward the chassis until the top tabs snap into their corresponding slots on the bezel. Removing and Replacing Front-Panel Inserts Empty drive bays contain a front-panel insert to protect the inside of the computer from dust particles and also to ensure proper airflow within the computer. Before you install a drive in an empty drive bay, you must first remove the front-panel insert. ring-tabs (2) Figure 7-3. Removing the Front-Panel Insert for a 5.25-Inch Bay To replace a front-panel insert for a 5.25-inch bay, work from inside the bezel. Insert the two ring-tabs (one on each end of the insert) over the posts on the inside of the bay opening, and firmly press both ends of the insert into place (see Figure 7-3). 7-2 Dell OptiPlex GXi Mini Tower Systems Reference and Installation Guide
-
 1
1 -
2
-
3
-
4
-
5
-
6
-
7
-
8
-
9
-
10
-
11
-
12
-
13
-
14
-
15
-
16
-
17
-
18
-
19
-
20
-
21
-
22
-
23
-
24
-
25
-
26
-
27
-
28
-
29
-
30
-
31
-
32
-
33
-
34
-
35
-
36
-
37
-
38
-
39
-
40
-
41
-
42
-
43
-
44
-
45
-
46
-
47
-
48
-
49
-
50
-
51
-
52
-
53
-
54
-
55
-
56
-
57
-
58
-
59
-
60
-
61
-
62
-
63
-
64
-
65
-
66
-
67
-
68
-
69
-
70
-
71
-
72
-
73
-
74
-
 75
75 -
 76
76 -
 77
77 -
 78
78 -
 79
79 -
 80
80 -
 81
81 -
 82
82 -
 83
83 -
 84
84 -
 85
85 -
86
-
87
-
88
-
89
-
90
-
91
-
92
-
93
-
94
-
95
-
96
-
97
-
98
-
99
-
100
-
101
-
102
-
103
-
104
-
105
-
106
-
107
-
108
-
109
-
110
-
111
-
112
-
113
-
114
-
115
-
116
-
117
-
118
-
119
-
120
-
121
-
122
-
123
-
124
-
125
-
126
 |
 |
