Dell OptiPlex GXi Reference and Installation Guide ( - Page 91
Primary to None. For instructions, see devices, see SCSI Cable and SCSI Termination
 |
View all Dell OptiPlex GXi manuals
Add to My Manuals
Save this manual to your list of manuals |
Page 91 highlights
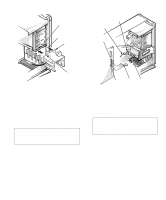
• To install an external SCSI tape drive, continue with step 5 of this procedure. 5. If you are installing a SCSI host adapter card, install it in an expansion slot now. See "Installing an Expansion Card" in Chapter 6. If a SCSI host adapter card is already installed, remove, reconfigure, and reinstall the card at this time. See the documentation that came with the SCSI host adapter card as well as "Removing an Expansion Card" and "Installing an Expansion Card" in Chapter 6. Connect the hard-disk drive access cable to the SCSI host adapter card and to the HDLED connector on the riser board (see Figure 6-3). This cable carries a signal from the SCSI host adapter card to the hard-disk drive access indicator on the computer's front panel whenever one of the SCSI hard-disk drives is accessed. 6. Attach the SCSI cable to each SCSI device. For additional instructions on connecting SCSI devices, see "SCSI Cable and SCSI Termination" found earlier in this section. If you are installing an internal SCSI device, firmly press the SCSI cable's header connector onto the 50or 68-pin connector on the back of the device. CAUTION: You must match the colored strip on the cable with pin 1 on the drive's interface connector to avoid possible damage to your system. The connectors on narrow SCSI cables are keyed for proper positioning-a raised area on the outside of the header connector fits into a notch on the device connector. The connectors on wide SCSI cables are shaped so that they can be attached one way only. If you are installing an external SCSI device, connect one end of the external SCSI cable to the SCSI bus connector on the back of the device. 7. Attach the SCSI cable to the connector on the SCSI host adapter card. • If you are installing an internal SCSI device, connect the colored edge on the internal SCSI cable to the pin-1 end of the 50-pin connector (for a narrow SCSI device) or the 68-pin connector (for a wide SCSI device) on the adapter card, and then press the cable connector firmly onto the adapter card connector. CAUTION: You must match the colored strip on the internal SCSI cable with pin 1 on the adapter card connector to avoid possible damage to your system. • If you are installing an external SCSI device, connect the other end of the external SCSI cable to the external connector on the adapter card. For additional instructions, see the documentation that came with the adapter card. 8. Connect the SCSI device(s) to power. • If you are installing an internal SCSI device, connect a DC power cable to the power input connector on the SCSI device. • If you are installing an external SCSI device, connect the socket-end of the power cable into the AC power receptacle on the back of the SCSI device. Connect the other end of the power cable into a standard electrical wall outlet. Check all other cable connections. Fold all internal cables out of the way to provide airflow for the fan or cooling vents. 9. If you installed an externally accessible device, remove the front-panel insert for that bay from the front bezel. Then replace the front bezel. 10. Replace the computer cover. Then reconnect your computer and peripherals to their power sources, and turn them on. 11. If necessary, enter the System Setup program to update the system configuration information. If you installed a SCSI hard-disk drive, set the Drive 0 and Drive 1 System Setup categories under Drives: Primary to None. For instructions, see Chapter 2, "Using the System Setup Program." Tape drives attached to a SCSI host adapter card are not part of the system configuration information. Installing Drives 7-13
-
 1
1 -
2
-
3
-
4
-
5
-
6
-
7
-
8
-
9
-
10
-
11
-
12
-
13
-
14
-
15
-
16
-
17
-
18
-
19
-
20
-
21
-
22
-
23
-
24
-
25
-
26
-
27
-
28
-
29
-
30
-
31
-
32
-
33
-
34
-
35
-
36
-
37
-
38
-
39
-
40
-
41
-
42
-
43
-
44
-
45
-
46
-
47
-
48
-
49
-
50
-
51
-
52
-
53
-
54
-
55
-
56
-
57
-
58
-
59
-
60
-
61
-
62
-
63
-
64
-
65
-
66
-
67
-
68
-
69
-
70
-
71
-
72
-
73
-
74
-
75
-
76
-
77
-
78
-
79
-
80
-
81
-
82
-
83
-
84
-
85
-
 86
86 -
 87
87 -
 88
88 -
 89
89 -
 90
90 -
 91
91 -
 92
92 -
 93
93 -
 94
94 -
 95
95 -
 96
96 -
97
-
98
-
99
-
100
-
101
-
102
-
103
-
104
-
105
-
106
-
107
-
108
-
109
-
110
-
111
-
112
-
113
-
114
-
115
-
116
-
117
-
118
-
119
-
120
-
121
-
122
-
123
-
124
-
125
-
126
 |
 |
