Dell PowerEdge R350 EMC Installation and Service Manual - Page 10
Table 3. Rear view of the system continued, Ports, panels, or slots, Description
 |
View all Dell PowerEdge R350 manuals
Add to My Manuals
Save this manual to your list of manuals |
Page 10 highlights
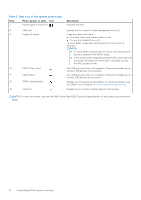
Table 3. Rear view of the system (continued) Item Ports, panels, or slots Icon 7 Power supply unit (PSU 1) 8 CMA jack 9 System ID button 10 USB 3.2 Gen 1 port 11 USB 2.0 port 12 iDRAC dedicated port 13 VGA port Description Indicates the PSU. Enables you to connect to cable management arm LED. Press the system ID button: ● To locate a particular system within a rack. ● To turn the system ID on or off. To reset iDRAC, press and hold the button for more than 16 seconds. NOTE: ● To reset iDRAC using system ID, ensure that the system ID button is enabled in the iDRAC setup. ● If the system stops responding during POST, press and hold the system ID button (for more than 5 seconds) to enter the BIOS progress mode. The USB ports are 9-pin, 3.0-compliant. These ports enable you to connect USB devices to the system. The USB ports are 4-pin, 2.0-compliant. These ports enable you to connect USB devices to the system. Enables you to remotely access iDRAC. For more information, see the iDRAC User's Guide at www.dell.com/poweredgemanuals. Enables you to connect a display device to the system. NOTE: For more information, see the Dell EMC PowerEdge R350 Technical Specifications on the product documentation page. 10 PowerEdge R350 system overview
-
 1
1 -
2
-
3
-
4
-
 5
5 -
 6
6 -
 7
7 -
 8
8 -
 9
9 -
 10
10 -
 11
11 -
 12
12 -
 13
13 -
 14
14 -
 15
15 -
16
-
17
-
18
-
19
-
20
-
21
-
22
-
23
-
24
-
25
-
26
-
27
-
28
-
29
-
30
-
31
-
32
-
33
-
34
-
35
-
36
-
37
-
38
-
39
-
40
-
41
-
42
-
43
-
44
-
45
-
46
-
47
-
48
-
49
-
50
-
51
-
52
-
53
-
54
-
55
-
56
-
57
-
58
-
59
-
60
-
61
-
62
-
63
-
64
-
65
-
66
-
67
-
68
-
69
-
70
-
71
-
72
-
73
-
74
-
75
-
76
-
77
-
78
-
79
-
80
-
81
-
82
-
83
-
84
-
85
-
86
-
87
-
88
-
89
-
90
-
91
-
92
-
93
-
94
-
95
-
96
-
97
-
98
-
99
-
100
-
101
-
102
-
103
-
104
-
105
-
106
 |
 |
