Dell PowerEdge R350 EMC Installation and Service Manual - Page 66
Front mounting front PERC module
 |
View all Dell PowerEdge R350 manuals
Add to My Manuals
Save this manual to your list of manuals |
Page 66 highlights
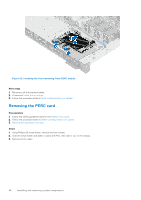
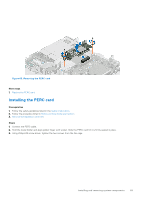
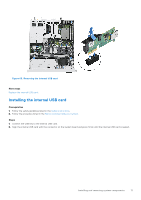
Figure 60. Installing the system battery Next steps 1. If applicable, Install the expansion card riser and connect the cables to the expansion card(s). 2. Follow the procedure listed in the After working inside your system. 3. Confirm that the battery is operating properly, by performing the following steps: a. Enter the System Setup, while booting, by pressing F2. b. Enter the correct time and date in the System Setup Time and Date fields. c. Exit the System Setup. d. To test the newly installed battery, remove the system from the enclosure for at least an hour. e. Reinstall the system into the enclosure after an hour. f. Enter the System Setup and if the time and date are still incorrect, see Getting help section. Front mounting front PERC module This is a service technician replaceable part only. Removing the front mounting front PERC module Prerequisites 1. Follow the safety guidelines listed in the Safety instructions. 2. Follow the procedure listed in the Before working inside your system. 3. If installed, remove the air shroud. 4. Disconnect all the cables, observe the cable routing. Steps 1. Using a Phillips #2 screwdriver, loosen the thumbscrews on the front PERC module. 2. Pull the front PERC module to disengage from the connector on the drive backplane. 3. Tilt and lift the front PERC module out of the system. NOTE: The numbers on the image do not depict the exact steps. The numbers are for representation of sequence. 66 Installing and removing system components
-
 1
1 -
2
-
3
-
4
-
5
-
6
-
7
-
8
-
9
-
10
-
11
-
12
-
13
-
14
-
15
-
16
-
17
-
18
-
19
-
20
-
21
-
22
-
23
-
24
-
25
-
26
-
27
-
28
-
29
-
30
-
31
-
32
-
33
-
34
-
35
-
36
-
37
-
38
-
39
-
40
-
41
-
42
-
43
-
44
-
45
-
46
-
47
-
48
-
49
-
50
-
51
-
52
-
53
-
54
-
55
-
56
-
57
-
58
-
59
-
60
-
 61
61 -
 62
62 -
 63
63 -
 64
64 -
 65
65 -
 66
66 -
 67
67 -
 68
68 -
 69
69 -
 70
70 -
 71
71 -
72
-
73
-
74
-
75
-
76
-
77
-
78
-
79
-
80
-
81
-
82
-
83
-
84
-
85
-
86
-
87
-
88
-
89
-
90
-
91
-
92
-
93
-
94
-
95
-
96
-
97
-
98
-
99
-
100
-
101
-
102
-
103
-
104
-
105
-
106
 |
 |
