Dell PowerEdge R720 Owner's Manual - Page 110
Removing and Installing the Control Panel-2.5 inch Hard Drives-PowerEdge R720
 |
View all Dell PowerEdge R720 manuals
Add to My Manuals
Save this manual to your list of manuals |
Page 110 highlights
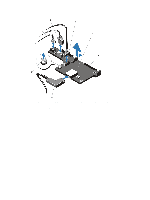
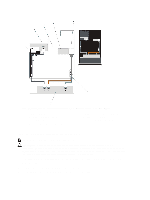
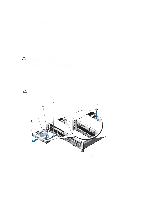
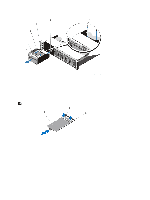
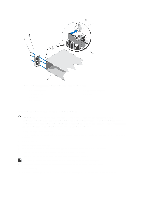
Figure 69. Removing and Installing the Control Panel-2.5 inch Hard Drives-PowerEdge R720 1. control panel 2. control-panel board 3. control-panel connector cable 4. USB connector cable 5. vFlash media connector cable 6. screws (2) 7. Locate and press the tabs on the information tag. 8. Push the information tag out of the slot to remove it from the control panel. NOTE: Retain the information tag for replacement in the new control panel. Figure 70. Removing and Installing the Information Tag 1. information tag 2. tabs (2) 3. slot 110
-
 1
1 -
2
-
3
-
4
-
5
-
6
-
7
-
8
-
9
-
10
-
11
-
12
-
13
-
14
-
15
-
16
-
17
-
18
-
19
-
20
-
21
-
22
-
23
-
24
-
25
-
26
-
27
-
28
-
29
-
30
-
31
-
32
-
33
-
34
-
35
-
36
-
37
-
38
-
39
-
40
-
41
-
42
-
43
-
44
-
45
-
46
-
47
-
48
-
49
-
50
-
51
-
52
-
53
-
54
-
55
-
56
-
57
-
58
-
59
-
60
-
61
-
62
-
63
-
64
-
65
-
66
-
67
-
68
-
69
-
70
-
71
-
72
-
73
-
74
-
75
-
76
-
77
-
78
-
79
-
80
-
81
-
82
-
83
-
84
-
85
-
86
-
87
-
88
-
89
-
90
-
91
-
92
-
93
-
94
-
95
-
96
-
97
-
98
-
99
-
100
-
101
-
102
-
103
-
104
-
 105
105 -
 106
106 -
 107
107 -
 108
108 -
 109
109 -
 110
110 -
 111
111 -
 112
112 -
 113
113 -
 114
114 -
 115
115 -
116
-
117
-
118
-
119
-
120
-
121
-
122
-
123
-
124
-
125
-
126
-
127
-
128
-
129
-
130
-
131
-
132
-
133
-
134
-
135
-
136
-
137
-
138
-
139
-
140
-
141
-
142
-
143
-
144
-
145
-
146
-
147
-
148
-
149
-
150
-
151
-
152
-
153
-
154
-
155
-
156
-
157
 |
 |

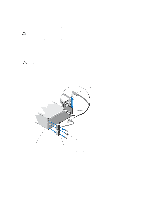
Figure 69. Removing and Installing the Control Panel—2.5 inch Hard Drives—PowerEdge R720
1. control panel
2. control-panel board
3. control-panel connector cable
4. USB connector cable
5. vFlash media connector cable
6. screws (2)
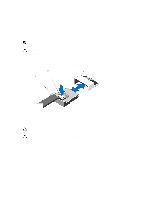
7.
Locate and press the tabs on the information tag.
8.
Push the information tag out of the slot to remove it from the control panel.
NOTE:
Retain the information tag for replacement in the new control panel.
Figure 70. Removing and Installing the Information Tag
1. information tag
2. tabs (2)
3. slot
110