Dell PowerEdge R740xd2 EMC Installation and Service Manual - Page 65
Drive bay, Opening the drive bays
 |
View all Dell PowerEdge R740xd2 manuals
Add to My Manuals
Save this manual to your list of manuals |
Page 65 highlights
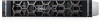
5. Open the drive bays, install all drives, and then close the drive bays. 6. Install the power supply units. 7. Follow the procedure listed in After working inside your system. Drive bay Opening the drive bays Prerequisites CAUTION: Drive bays should not be in service position for more than 5 minutes because of thermal concerns. When the drive bay is open for more than five minutes, the cooling fans spin at a higher speed to provide extra cooling to the system. Thus system health status changes from the normal to critical state, and system event "The BP1 drive bay is kept open for an extended period of time" is logged. 1. Follow the safety guidelines listed in Safety instructions. 2. If installed, remove front bezel. Steps 1. If locked, unlock the drive bay lock located above the left release latch, by pushing it up. 2. Open the release latches of drive bay 1 and pull the drive bays out. Figure 39. Opening the drive bays Next steps 1. If installed, remove a drive blank or install a drive blank. 2. If installed, remove a drive carrier or install a drive carrier. Installing and removing system components 65
-
 1
1 -
2
-
3
-
4
-
5
-
6
-
7
-
8
-
9
-
10
-
11
-
12
-
13
-
14
-
15
-
16
-
17
-
18
-
19
-
20
-
21
-
22
-
23
-
24
-
25
-
26
-
27
-
28
-
29
-
30
-
31
-
32
-
33
-
34
-
35
-
36
-
37
-
38
-
39
-
40
-
41
-
42
-
43
-
44
-
45
-
46
-
47
-
48
-
49
-
50
-
51
-
52
-
53
-
54
-
55
-
56
-
57
-
58
-
59
-
 60
60 -
 61
61 -
 62
62 -
 63
63 -
 64
64 -
 65
65 -
 66
66 -
 67
67 -
 68
68 -
 69
69 -
 70
70 -
71
-
72
-
73
-
74
-
75
-
76
-
77
-
78
-
79
-
80
-
81
-
82
-
83
-
84
-
85
-
86
-
87
-
88
-
89
-
90
-
91
-
92
-
93
-
94
-
95
-
96
-
97
-
98
-
99
-
100
-
101
-
102
-
103
-
104
-
105
-
106
-
107
-
108
-
109
-
110
-
111
-
112
-
113
-
114
-
115
-
116
-
117
-
118
-
119
-
120
-
121
-
122
-
123
-
124
-
125
-
126
-
127
-
128
-
129
-
130
-
131
-
132
-
133
-
134
-
135
-
136
-
137
-
138
-
139
-
140
-
141
-
142
-
143
-
144
-
145
-
146
-
147
-
148
-
149
-
150
-
151
-
152
-
153
-
154
-
155
-
156
-
157
-
158
-
159
-
160
-
161
-
162
-
163
-
164
-
165
-
166
-
167
-
168
-
169
-
170
-
171
-
172
-
173
-
174
-
175
-
176
-
177
-
178
-
179
-
180
-
181
-
182
 |
 |
