Dell PowerEdge T620 Owner's Manual - Page 63
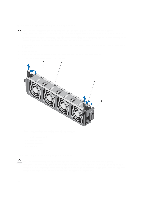
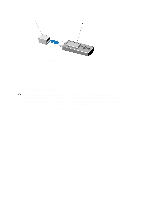
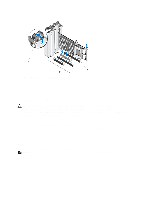
Removing An Expansion Card, Lay the system on its side.
 |
View all Dell PowerEdge T620 manuals
Add to My Manuals
Save this manual to your list of manuals |
Page 63 highlights
• A dual processor configuration supports up to four double or single width cards on slots 2, 4, 5, and 7. • Both the processors must be installed to use slots 5 and 7. • Two double width GPU cards on a single processor configuration and four double width GPU cards on a dual processor configuration do not support any other add-on cards. • On a system with four double-width GPU cards, the hard-drive setting must be either onboard SATA controller or S110. • Two single width GPU cards on a single processor configuration and four single width GPU cards on a dual processor configuration do not support H710, H710P, and H810. • A system with Express Flash configuration supports a maximum of two GPU cards. • The GPU cards must be installed: - Only on the x16 PCIe Generation 2 interfaces available on slots 2, 4, 5, and 7. - On systems that support one 5.25 inch removable media storage devices. - On systems with six fan configuration. - On systems that have the 1100 W power supply. NOTE: When you have more than two GPU cards on your system, you will need two 1100 W PSUs installed on your system. Removing An Expansion Card CAUTION: Many repairs may only be done by a certified service technician. You should only perform troubleshooting and simple repairs as authorized in your product documentation, or as directed by the online or telephone service and support team. Damage due to servicing that is not authorized by Dell is not covered by your warranty. Read and follow the safety instructions that came with the product. 1. Turn off the system, including any attached peripherals, and disconnect the system from the electrical outlet and peripherals. 2. Lay the system on its side. 3. Open the system. 4. Remove the PCIe card holder. 5. If applicable, disconnect the data cables for the PERC card or/and the power cables from the GPU card. 6. Open the PCIe card latch. 7. Grasp the card by its edge, pull the card up to remove it from the card connector, and continue to pull the card up and out of the card guides. 8. Close the PCIe card latch. 9. Replace the PCIe card holder. 10. Close the system. 11. Place the system upright. 12. Reconnect the system to its electrical outlet and turn the system on, including any attached peripherals. 63
-
 1
1 -
2
-
3
-
4
-
5
-
6
-
7
-
8
-
9
-
10
-
11
-
12
-
13
-
14
-
15
-
16
-
17
-
18
-
19
-
20
-
21
-
22
-
23
-
24
-
25
-
26
-
27
-
28
-
29
-
30
-
31
-
32
-
33
-
34
-
35
-
36
-
37
-
38
-
39
-
40
-
41
-
42
-
43
-
44
-
45
-
46
-
47
-
48
-
49
-
50
-
51
-
52
-
53
-
54
-
55
-
56
-
57
-
 58
58 -
 59
59 -
 60
60 -
 61
61 -
 62
62 -
 63
63 -
 64
64 -
 65
65 -
 66
66 -
 67
67 -
 68
68 -
69
-
70
-
71
-
72
-
73
-
74
-
75
-
76
-
77
-
78
-
79
-
80
-
81
-
82
-
83
-
84
-
85
-
86
-
87
-
88
-
89
-
90
-
91
-
92
-
93
-
94
-
95
-
96
-
97
-
98
-
99
-
100
-
101
-
102
-
103
-
104
-
105
-
106
-
107
-
108
-
109
-
110
-
111
-
112
-
113
-
114
-
115
-
116
-
117
-
118
-
119
-
120
-
121
-
122
-
123
-
124
-
125
-
126
-
127
-
128
-
129
-
130
-
131
-
132
-
133
-
134
-
135
-
136
-
137
-
138
-
139
-
140
-
141
-
142
-
143
-
144
-
145
-
146
-
147
-
148
-
149
 |
 |
