Dell PowerEdge T640 EMC PowerEdge T640 Installation and Service Manual - Page 71
Installing caster wheels
 |
View all Dell PowerEdge T640 manuals
Add to My Manuals
Save this manual to your list of manuals |
Page 71 highlights
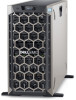
Figure 29. Removing caster wheels Next steps 1. Install the caster wheels or the system feet, as applicable. Installing caster wheels Prerequisites 1. Follow the safety guidelines listed in Safety instructions on page 65. 2. Place the system on its side on a flat, stable surface. 3. If installed, remove the system feet. Steps 1. Align the two retention hooks on the rear wheel unit with the two slots on the base of the system, and insert the hooks into the slots. 2. Push the rear wheel unit toward the back of the system and using a Phillips #2 screwdriver secure the unit in place using a single screw. 3. Align the two retention hooks on the front wheel unit with the two slots on the base of the system, and insert the hooks into the slots. 4. Push the front wheel unit toward the front of the system and using a Phillips #2 screwdriver secure the unit in place using a single screw. Installing and removing system components 71
-
 1
1 -
2
-
3
-
4
-
5
-
6
-
7
-
8
-
9
-
10
-
11
-
12
-
13
-
14
-
15
-
16
-
17
-
18
-
19
-
20
-
21
-
22
-
23
-
24
-
25
-
26
-
27
-
28
-
29
-
30
-
31
-
32
-
33
-
34
-
35
-
36
-
37
-
38
-
39
-
40
-
41
-
42
-
43
-
44
-
45
-
46
-
47
-
48
-
49
-
50
-
51
-
52
-
53
-
54
-
55
-
56
-
57
-
58
-
59
-
60
-
61
-
62
-
63
-
64
-
65
-
 66
66 -
 67
67 -
 68
68 -
 69
69 -
 70
70 -
 71
71 -
 72
72 -
 73
73 -
 74
74 -
 75
75 -
 76
76 -
77
-
78
-
79
-
80
-
81
-
82
-
83
-
84
-
85
-
86
-
87
-
88
-
89
-
90
-
91
-
92
-
93
-
94
-
95
-
96
-
97
-
98
-
99
-
100
-
101
-
102
-
103
-
104
-
105
-
106
-
107
-
108
-
109
-
110
-
111
-
112
-
113
-
114
-
115
-
116
-
117
-
118
-
119
-
120
-
121
-
122
-
123
-
124
-
125
-
126
-
127
-
128
-
129
-
130
-
131
-
132
-
133
-
134
-
135
-
136
-
137
-
138
-
139
-
140
-
141
-
142
-
143
-
144
-
145
-
146
-
147
-
148
-
149
-
150
-
151
-
152
-
153
-
154
-
155
-
156
-
157
-
158
-
159
-
160
-
161
-
162
-
163
-
164
-
165
 |
 |
