Dell Studio 1735 Quick Reference Guide - Page 20
Removing and Replacing the Battery - battery replacement
 |
View all Dell Studio 1735 manuals
Add to My Manuals
Save this manual to your list of manuals |
Page 20 highlights
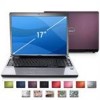
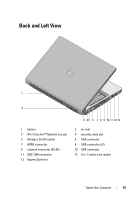
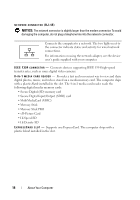
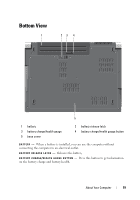
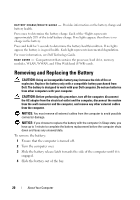
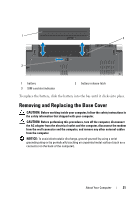
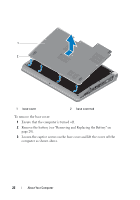
B A T T E R Y C H A R G E / H E A L T H G A U G E - Provides information on the battery charge and battery health. Press once to determine the battery charge. Each of the 4 lights represents approximately 20% of the total battery charge. If no lights appear, then there is no charge in the battery. Press and hold for 3 seconds to determine the battery health/condition. If no lights appear, the battery is in good health. Each light represents incremental degradation. For more information, see Dell Technology Guide. B A S E C O V E R - Compartment that contains the processor, hard drive, memory modules, WLAN, WWAN, and Ultra Wideband (UWB) cards. Removing and Replacing the Battery CAUTION: Using an incompatible battery may increase the risk of fire or explosion. Replace the battery only with a compatible battery purchased from Dell. The battery is designed to work with your Dell computer. Do not use batteries from other computers with your computer. CAUTION: Before performing this procedure, turn off the computer, disconnect the AC adapter from the electrical outlet and the computer, disconnect the modem from the wall connector and the computer, and remove any other external cables from the computer. NOTICE: You must remove all external cables from the computer to avoid possible connector damage. NOTICE: If you choose to replace the battery with the computer in Sleep state, you have up to 1 minute to complete the battery replacement before the computer shuts down and loses any unsaved data. To remove the battery: 1 Ensure that the computer is turned off. 2 Turn the computer over. 3 Slide the battery release latch towards the side of the computer until it is engaged. 4 Slide the battery out of the bay. 20 About Your Computer
-
 1
1 -
2
-
3
-
4
-
5
-
6
-
7
-
8
-
9
-
10
-
11
-
12
-
13
-
14
-
 15
15 -
 16
16 -
 17
17 -
 18
18 -
 19
19 -
 20
20 -
 21
21 -
 22
22 -
 23
23 -
 24
24 -
 25
25 -
26
-
27
-
28
-
29
-
30
-
31
-
32
-
33
-
34
-
35
-
36
-
37
-
38
-
39
-
40
-
41
-
42
-
43
-
44
-
45
-
46
-
47
-
48
-
49
-
50
-
51
-
52
-
53
-
54
-
55
-
56
-
57
-
58
-
59
-
60
-
61
-
62
-
63
-
64
 |
 |