Dell XPS M1730 M1730 XPS M1730 Owners Manual - Page 155
Replacing the Hard Drive Cage, Memory
 |
View all Dell XPS M1730 M1730 manuals
Add to My Manuals
Save this manual to your list of manuals |
Page 155 highlights
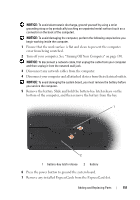
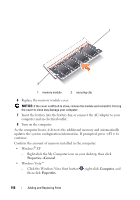
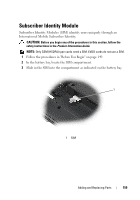
Replacing the Hard Drive Cage 1 Place the hard drive cage upside down on the bottom of the computer with the SATA connectors and cables aligned, and then firmly press the cables onto the hard drives' connectors. 2 Flip the hard drive cage over and into the hard drive bay. 3 Tighten the screws on the drive cage. 4 Replace the hard drive cover and tighten the screws. 5 If you have replaced the primary hard drive with a new hard drive that is not already pre-imaged, install the operating system and drivers for your computer. See "Restoring Your Operating System" on page 140 and "Reinstalling Drivers and Utilities" on page 136. Memory You can increase your computer memory by installing memory modules on the system board. See "Specifications" on page 171 for information on the memory supported by your computer. Install only memory modules that are intended for your computer. NOTE: In order to take advantage of the dual channel bandwidth capability, both memory slots must be populated and must match in size. NOTE: Memory modules purchased from Dell are covered under your computer warranty. CAUTION: Before you begin any of the procedures in this section, follow the safety instructions located in the Product Information Guide. NOTICE: To avoid electrostatic discharge, ground yourself by using a wrist grounding strap or by periodically touching an unpainted metal surface (such as a connector on the back of the computer). NOTICE: To avoid damaging the system board, you must remove the battery before you begin working inside the computer. 1 Follow the procedures in"Before You Begin" on page 149. 2 Ground yourself by touching one of the metal connectors on the back of the computer. NOTE: If you leave the area, ground yourself again when you return to the computer. Adding and Replacing Parts 155
-
 1
1 -
2
-
3
-
4
-
5
-
6
-
7
-
8
-
9
-
10
-
11
-
12
-
13
-
14
-
15
-
16
-
17
-
18
-
19
-
20
-
21
-
22
-
23
-
24
-
25
-
26
-
27
-
28
-
29
-
30
-
31
-
32
-
33
-
34
-
35
-
36
-
37
-
38
-
39
-
40
-
41
-
42
-
43
-
44
-
45
-
46
-
47
-
48
-
49
-
50
-
51
-
52
-
53
-
54
-
55
-
56
-
57
-
58
-
59
-
60
-
61
-
62
-
63
-
64
-
65
-
66
-
67
-
68
-
69
-
70
-
71
-
72
-
73
-
74
-
75
-
76
-
77
-
78
-
79
-
80
-
81
-
82
-
83
-
84
-
85
-
86
-
87
-
88
-
89
-
90
-
91
-
92
-
93
-
94
-
95
-
96
-
97
-
98
-
99
-
100
-
101
-
102
-
103
-
104
-
105
-
106
-
107
-
108
-
109
-
110
-
111
-
112
-
113
-
114
-
115
-
116
-
117
-
118
-
119
-
120
-
121
-
122
-
123
-
124
-
125
-
126
-
127
-
128
-
129
-
130
-
131
-
132
-
133
-
134
-
135
-
136
-
137
-
138
-
139
-
140
-
141
-
142
-
143
-
144
-
145
-
146
-
147
-
148
-
149
-
 150
150 -
 151
151 -
 152
152 -
 153
153 -
 154
154 -
 155
155 -
 156
156 -
 157
157 -
 158
158 -
 159
159 -
 160
160 -
161
-
162
-
163
-
164
-
165
-
166
-
167
-
168
-
169
-
170
-
171
-
172
-
173
-
174
-
175
-
176
-
177
-
178
-
179
-
180
-
181
-
182
-
183
-
184
-
185
-
186
-
187
-
188
-
189
-
190
-
191
-
192
-
193
-
194
-
195
-
196
-
197
-
198
-
199
-
200
-
201
-
202
-
203
-
204
-
205
-
206
-
207
-
208
 |
 |
