Epson 7880 Network Guide - Page 28
Configuring the Network Interface Using EpsonNet Config with, Web Browser
 |
UPC - 010343866874
View all Epson 7880 manuals
Add to My Manuals
Save this manual to your list of manuals |
Page 28 highlights
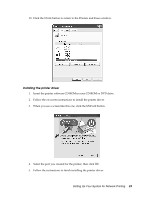
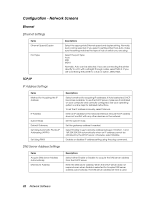
Configuring the Network Interface Using EpsonNet Config with Web Browser After you have assigned an IP address to the network interface using the printer's Control panel, EpsonNet Config for Windows or Macintosh, a DHCP server, or the arp/ping command, you can configure the network interface using EpsonNet Config with Web Browser. Note: ❏ A Web browser must be installed on your computer. ❏ TCP/IP must be correctly set for the computer and the network interface. Follow the steps below to change the IP address using EpsonNet Config. 1. Turn on your printer. 2. Run EpsonNet Config in one of the following ways. ❏ Run EpsonNet Config for Windows or Macintosh. Select the printer you want to configure from the list and then click Launch Browser. ❏ Open your browser, and then type in the IP address of the network interface directly. Do not run EpsonNet Config for Windows or Macintosh. http://IP address of network interface/ Example: http://192.168.100.201/ Note: To check the IP address of the network interface, use EpsonNet Config. For details, see "EpsonNet Config for Windows" on page 25 or "EpsonNet Config for Macintosh" on page 26. 3. Click TCP/IP under Network on the Configuration menu to display the TCP/IP setting screen. 4. Select a method for acquiring the IP address. When you select Auto, DHCP becomes available and assigns an IP address automatically. If you want to set the IP address manually, select Manual. Note: ❏ The network administrator must check any changes made to the IP address settings. ❏ When Auto is selected, DHCP becomes available. To use the DHCP server, make sure it is installed on your computer and correctly configured. See your operating system's online help for detailed instructions. ❏ If Set Using Automatic Private IP Addressing (APIPA) is enabled, a private IP address is automatically assigned to the network interface even when there are no DHCP servers on your system or your network. 28 Network Software
-
 1
1 -
2
-
3
-
4
-
5
-
6
-
7
-
8
-
9
-
10
-
11
-
12
-
13
-
14
-
15
-
16
-
17
-
18
-
19
-
20
-
21
-
22
-
 23
23 -
 24
24 -
 25
25 -
 26
26 -
 27
27 -
 28
28 -
 29
29 -
 30
30 -
 31
31 -
 32
32 -
 33
33 -
34
-
35
-
36
-
37
-
38
-
39
-
40
-
41
-
42
-
43
-
44
-
45
-
46
 |
 |