Epson 7880 Network Guide - Page 29
Register Network Interface Address Directly to DNS Server
 |
UPC - 010343866874
View all Epson 7880 manuals
Add to My Manuals
Save this manual to your list of manuals |
Page 29 highlights
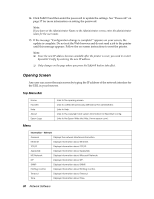
❏ If the Dynamic DNS function is not supported, we recommend that you select Manual and then enter an IP address. This is because if you select Auto, the IP address of the network interface changes every time you turn on the printer so that you need to change the printer port setting accordingly. 5. To assign an IP address manually, enter the IP address, the subnet mask, and the default gateway. Be sure the IP address does not conflict with any other devices on the network. Note: If there is a server or a router functioning as a gateway, enter the IP address of the server or the router for the gateway address. If there is no gateway, leave the default values there. 6. If you want to get a private address between 169.254.1.1 and 169.254.254.254 automatically when an IP address cannot be obtained by the DHCP server, leave it at Enable for Set Using Automatic Private IP Addressing (APIPA); otherwise, select Disable. 7. When setting an IP address using the ping command, select Enable for Set Using PING. Select Disable when setting an IP address with EpsonNet Config; this prevents any unexpected change of the IP address. 8. Select Enable for Acquire DNS Server Address Automatically if you want to acquire the DNS server address using the DHCP server. If you want to enter the DNS server address manually, select Disable and then enter the IP address of the DNS server. 9. Select Enable for Acquire Host Name and Domain Name Automatically if you want to acquire the host name and the domain name using the DHCP server. If you want to specify manually, enter the host name and the domain name in the text boxes. 10. Select Enable for Register Network Interface Address to DNS Server if you want to register the host name and domain name to the DNS server through the DHCP server that supports Dynamic DNS. If you want to register the host name and the domain name directly to the DNS server, select Enable for Register Network Interface Address Directly to DNS Server. 11. Select Enable or Disable for Use Universal Plug and Play. Select Enable if you want to use the Universal Plug and Play function. 12. Change the default Universal Plug and Play device name, if desired. This device name is used for Windows systems that support the Universal Plug and Play function. 13. Mac OS X only: Select Enable or Disable for Use Bonjour. If you select Enable, enter the Bonjour Name and the Bonjour Printer Name. If your network environment supports DHCP, you can use the printer on the network just by enabling this setting. Network Software 29
-
 1
1 -
2
-
3
-
4
-
5
-
6
-
7
-
8
-
9
-
10
-
11
-
12
-
13
-
14
-
15
-
16
-
17
-
18
-
19
-
20
-
21
-
22
-
23
-
 24
24 -
 25
25 -
 26
26 -
 27
27 -
 28
28 -
 29
29 -
 30
30 -
 31
31 -
 32
32 -
 33
33 -
 34
34 -
35
-
36
-
37
-
38
-
39
-
40
-
41
-
42
-
43
-
44
-
45
-
46
 |
 |