Epson CX5400 Quick Reference Guide - Page 13
Selecting Photo Settings, Copy mode, Standard Margins, BorderFree, Small margins, Quality&Paper
 |
UPC - 010343848412
View all Epson CX5400 manuals
Add to My Manuals
Save this manual to your list of manuals |
Page 13 highlights
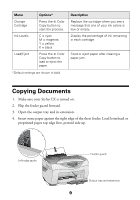
6. Open the scanner lid and place your photo face-down on the glass, in the upper left corner. Make sure you place the short edge of the photo next to the left side of the glass. Move the photo about 0.1 inch from the top and side edge so the entire photo is scanned. Move the photo in about 0.1 inch from the edges Right menu button 7. Close the scanner lid. Selecting Photo Settings 1. Press the right Menu button to display Copy mode Copy mode on the LCD screen. Standard Margins ■ If you want a photo without white borders, press Copy mode the - Value button to select Border Free. BorderFree ■ If you want a photo with small white borders press the - Value button again to select Small margins. Copy mode Small margins 2. Press the right Menu button again to display Quality&Paper. Quality&Paper Photo Paper If you're using DURABrite Ink Glossy Photo Paper, press the - Value button to select DB Photo Paper. 3. Press the right Menu button to display Paper size 4 × 6. Paper size 4x6 4. Press the y Stop button to save your settings. 13
-
 1
1 -
2
-
3
-
4
-
5
-
6
-
7
-
 8
8 -
 9
9 -
 10
10 -
 11
11 -
 12
12 -
 13
13 -
 14
14 -
 15
15 -
 16
16 -
 17
17 -
 18
18 -
19
-
20
-
21
-
22
-
23
-
24
-
25
-
26
-
27
-
28
-
29
-
30
-
31
-
32
-
33
-
34
-
35
-
36
-
37
-
38
-
39
-
40
 |
 |
