Epson EPL-N2000 User Manual - Page 86
proper holes on the back of the printer. To avoid damaging, the unit
 |
View all Epson EPL-N2000 manuals
Add to My Manuals
Save this manual to your list of manuals |
Page 86 highlights
5. Align the two holes at the bottom of the Duplex Unit with the hooks. (Arrows point to the holes.) 6. Attach the unit to the printer, making sure that the connectors and screws on the back of the unit enter the proper holes on the back of the printer. To avoid damaging the unit, be careful not to let it go until you have attached the screws. 7. Secure the unit with the two screws that came with it. 4-18 Installing Options
-
 1
1 -
2
-
3
-
4
-
5
-
6
-
7
-
8
-
9
-
10
-
11
-
12
-
13
-
14
-
15
-
16
-
17
-
18
-
19
-
20
-
21
-
22
-
23
-
24
-
25
-
26
-
27
-
28
-
29
-
30
-
31
-
32
-
33
-
34
-
35
-
36
-
37
-
38
-
39
-
40
-
41
-
42
-
43
-
44
-
45
-
46
-
47
-
48
-
49
-
50
-
51
-
52
-
53
-
54
-
55
-
56
-
57
-
58
-
59
-
60
-
61
-
62
-
63
-
64
-
65
-
66
-
67
-
68
-
69
-
70
-
71
-
72
-
73
-
74
-
75
-
76
-
77
-
78
-
79
-
80
-
 81
81 -
 82
82 -
 83
83 -
 84
84 -
 85
85 -
 86
86 -
 87
87 -
 88
88 -
 89
89 -
 90
90 -
 91
91 -
92
-
93
-
94
-
95
-
96
-
97
-
98
-
99
-
100
-
101
-
102
-
103
-
104
-
105
-
106
-
107
-
108
-
109
-
110
-
111
-
112
-
113
-
114
-
115
-
116
-
117
-
118
-
119
-
120
-
121
-
122
-
123
-
124
-
125
-
126
-
127
-
128
-
129
-
130
-
131
-
132
-
133
-
134
-
135
-
136
-
137
-
138
-
139
-
140
-
141
-
142
-
143
-
144
-
145
 |
 |

4-18
Installing Options
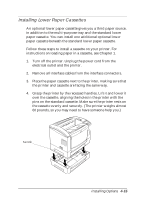
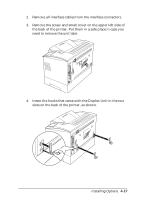
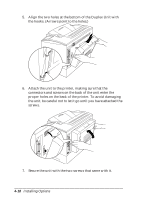
5.
Align the two holes at the bottom of the Duplex Unit with
the hooks. (Arrows point to the holes.)
6.
Attach the unit to the printer, making sure that the
connectors and screws on the back of the unit enter the
proper holes on the back of the printer. To avoid damaging
the unit, be careful not to let it go until you have attached the
screws.
7.
Secure the unit with the two screws that came with it.