Epson EPL-N2000 User Manual - Page 95
Replacing the Imaging Cartridge
 |
View all Epson EPL-N2000 manuals
Add to My Manuals
Save this manual to your list of manuals |
Page 95 highlights
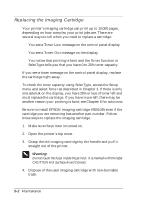
Replacing the Imaging Cartridge Your printer's imaging cartridge can print up to 10,000 pages, depending on how complex your print jobs are. There are several ways to tell when you need to replace a cartridge: t You see a Toner Low message on the control panel display t You see a Toner Out message on the display t You notice that printing is faint and the Toner function in SelecType tells you that you have 0 to 25% toner capacity. If you see a toner message on the control panel display, replace the cartridge right away. To check the toner capacity using SelecType, access the Setup menu and select Toner as described in Chapter 3. If there is only one asterisk on the display, you have 25% or less of toner left and must replace the cartridge. If you have more left, there may be another reason your printing is faint; see Chapter 6 for solutions. Be sure to install EPSON imaging cartridge #S051035 even if the cartridge you are removing has another part number. Follow these steps to replace the imaging cartridge: 1. Make sure the printer is turned on. 2. Open the printer's top cover. 3. Grasp the old imaging cartridge by the handle and pull it straight out of the printer. w Warning: Do not touch the fuser inside the printer; it is marked with the label CAUTION Hot Surface Avoid Contact. 4. Dispose of the used imaging cartridge with non-burnable trash. 5-2 Maintenance
-
 1
1 -
2
-
3
-
4
-
5
-
6
-
7
-
8
-
9
-
10
-
11
-
12
-
13
-
14
-
15
-
16
-
17
-
18
-
19
-
20
-
21
-
22
-
23
-
24
-
25
-
26
-
27
-
28
-
29
-
30
-
31
-
32
-
33
-
34
-
35
-
36
-
37
-
38
-
39
-
40
-
41
-
42
-
43
-
44
-
45
-
46
-
47
-
48
-
49
-
50
-
51
-
52
-
53
-
54
-
55
-
56
-
57
-
58
-
59
-
60
-
61
-
62
-
63
-
64
-
65
-
66
-
67
-
68
-
69
-
70
-
71
-
72
-
73
-
74
-
75
-
76
-
77
-
78
-
79
-
80
-
81
-
82
-
83
-
84
-
85
-
86
-
87
-
88
-
89
-
 90
90 -
 91
91 -
 92
92 -
 93
93 -
 94
94 -
 95
95 -
 96
96 -
 97
97 -
 98
98 -
 99
99 -
 100
100 -
101
-
102
-
103
-
104
-
105
-
106
-
107
-
108
-
109
-
110
-
111
-
112
-
113
-
114
-
115
-
116
-
117
-
118
-
119
-
120
-
121
-
122
-
123
-
124
-
125
-
126
-
127
-
128
-
129
-
130
-
131
-
132
-
133
-
134
-
135
-
136
-
137
-
138
-
139
-
140
-
141
-
142
-
143
-
144
-
145
 |
 |
