Epson ET-2550 User Manual - Page 170
Aligning the Print Head Using the Product Control Panel, Parent topic, Setup, Maintenance
 |
View all Epson ET-2550 manuals
Add to My Manuals
Save this manual to your list of manuals |
Page 170 highlights
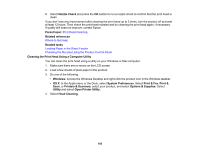
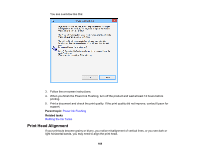
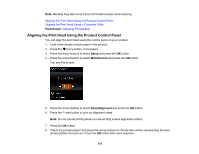
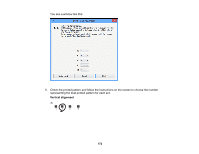
Note: Banding may also occur if your print head nozzles need cleaning. Aligning the Print Head Using the Product Control Panel Aligning the Print Head Using a Computer Utility Parent topic: Adjusting Print Quality Aligning the Print Head Using the Product Control Panel You can align the print head using the control panel on your product. 1. Load a few sheets of plain paper in the product. 2. Press the home button, if necessary. 3. Press the arrow buttons to select Setup and press the OK button. 4. Press the arrow buttons to select Maintenance and press the OK button. You see this screen: 5. Press the arrow buttons to select Head Alignment and press the OK button. 6. Press the start button to print an alignment sheet. Note: Do not cancel printing while you are printing a head alignment pattern. 7. Press the OK button. 8. Check the printed pattern and press the arrow buttons to choose the number representing the best printed pattern for each set. Press the OK button after each selection. 170
-
 1
1 -
2
-
3
-
4
-
5
-
6
-
7
-
8
-
9
-
10
-
11
-
12
-
13
-
14
-
15
-
16
-
17
-
18
-
19
-
20
-
21
-
22
-
23
-
24
-
25
-
26
-
27
-
28
-
29
-
30
-
31
-
32
-
33
-
34
-
35
-
36
-
37
-
38
-
39
-
40
-
41
-
42
-
43
-
44
-
45
-
46
-
47
-
48
-
49
-
50
-
51
-
52
-
53
-
54
-
55
-
56
-
57
-
58
-
59
-
60
-
61
-
62
-
63
-
64
-
65
-
66
-
67
-
68
-
69
-
70
-
71
-
72
-
73
-
74
-
75
-
76
-
77
-
78
-
79
-
80
-
81
-
82
-
83
-
84
-
85
-
86
-
87
-
88
-
89
-
90
-
91
-
92
-
93
-
94
-
95
-
96
-
97
-
98
-
99
-
100
-
101
-
102
-
103
-
104
-
105
-
106
-
107
-
108
-
109
-
110
-
111
-
112
-
113
-
114
-
115
-
116
-
117
-
118
-
119
-
120
-
121
-
122
-
123
-
124
-
125
-
126
-
127
-
128
-
129
-
130
-
131
-
132
-
133
-
134
-
135
-
136
-
137
-
138
-
139
-
140
-
141
-
142
-
143
-
144
-
145
-
146
-
147
-
148
-
149
-
150
-
151
-
152
-
153
-
154
-
155
-
156
-
157
-
158
-
159
-
160
-
161
-
162
-
163
-
164
-
 165
165 -
 166
166 -
 167
167 -
 168
168 -
 169
169 -
 170
170 -
 171
171 -
 172
172 -
 173
173 -
 174
174 -
 175
175 -
176
-
177
-
178
-
179
-
180
-
181
-
182
-
183
-
184
-
185
-
186
-
187
-
188
-
189
-
190
-
191
-
192
-
193
-
194
-
195
-
196
-
197
-
198
-
199
-
200
-
201
-
202
-
203
-
204
-
205
-
206
-
207
-
208
-
209
-
210
-
211
-
212
-
213
-
214
-
215
-
216
-
217
-
218
-
219
-
220
-
221
-
222
-
223
-
224
-
225
-
226
-
227
-
228
-
229
-
230
-
231
-
232
 |
 |