Epson Ensemble HD 6500 Installation Guide - Page 35
Attach the Extension Arm (Optional), ceiling is sloped, you must use the extension arm
 |
View all Epson Ensemble HD 6500 manuals
Add to My Manuals
Save this manual to your list of manuals |
Page 35 highlights
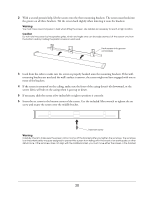
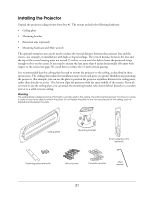
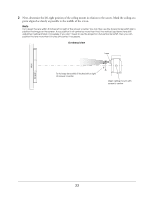
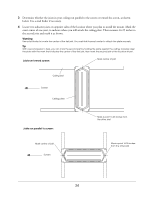
5 Hold the ceiling plate in place over the planned mounting location to ensure that the holes in the plate line up with the marks you drew on the ceiling. 6 Take the plate down and drill the two marked holes (you'll drill the remaining holes after attaching the plate). 7 Continue to the next section if you plan to use the extension arm. Otherwise, continue to "Install the Ceiling Mount" on page 37. Attach the Extension Arm (Optional) The projector's ceiling mount is designed to let you attach the projector as close to the ceiling as possible. For most installations, this creates a clean appearance and makes the projector less likely to be bumped into. In some cases, however, you may want to attach the included extension arm, which lowers the projector by about 8 inches. This may help, for example, if you have track lighting that would interfere with the projected image, or if the screen is mounted lower on the wall and you want to bring the projector down to screen level. If your ceiling is sloped, you must use the extension arm, or the projector won't be level. Follow these steps to attach the extension arm: 1 Use the included Allen wrench to remove the bolt shown below. The sections come apart. 2 Remove the two bolts shown below and separate the components. Set aside the middle part; you will replace it with the extension arm. Set aside this part (not needed) 35
-
 1
1 -
2
-
3
-
4
-
5
-
6
-
7
-
8
-
9
-
10
-
11
-
12
-
13
-
14
-
15
-
16
-
17
-
18
-
19
-
20
-
21
-
22
-
23
-
24
-
25
-
26
-
27
-
28
-
29
-
 30
30 -
 31
31 -
 32
32 -
 33
33 -
 34
34 -
 35
35 -
 36
36 -
 37
37 -
 38
38 -
 39
39 -
 40
40 -
41
-
42
-
43
-
44
-
45
-
46
-
47
-
48
-
49
-
50
-
51
-
52
-
53
-
54
-
55
-
56
-
57
-
58
-
59
-
60
-
61
-
62
-
63
-
64
-
65
-
66
-
67
-
68
-
69
-
70
-
71
 |
 |
