Epson Ensemble HD 6500 Installation Guide - Page 37
Install the Ceiling Mount, hold the parts in place.
 |
View all Epson Ensemble HD 6500 manuals
Add to My Manuals
Save this manual to your list of manuals |
Page 37 highlights
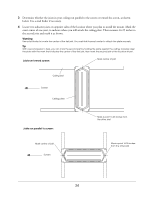
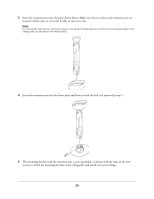
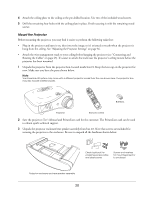
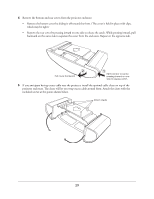
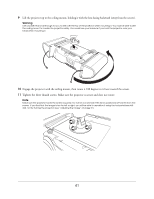
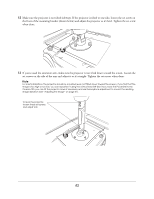
Install the Ceiling Mount 1 To install the mounting bracket, first remove the piece shown below. Take out the two bolts to remove it. Note If you attached the extension arm as described in the previous section, skip to step 2. Remove this piece 2 Attach the removed piece of the mounting bracket to the ceiling plate, as shown below. Use the included fastening plate and bolts to attach it. The fastening plate goes on the recessed side of the ceiling plate. Before tightening the bolts fully, check exactly where the projector will be mounted between your ceiling joists. Then use the slots in the ceiling plate to slide the parts to the desired location. Tighten the bolts to hold the parts in place. Recessed side of ceiling plate (underneath) Fastening plate 3 Re-attach the rest of the mounting bracket using the bolts you removed in step 1 (or in the previous section, if you added the extension arm). Loosely tighten the bolts for now, so that you can still rotate the assembly. 37
-
 1
1 -
2
-
3
-
4
-
5
-
6
-
7
-
8
-
9
-
10
-
11
-
12
-
13
-
14
-
15
-
16
-
17
-
18
-
19
-
20
-
21
-
22
-
23
-
24
-
25
-
26
-
27
-
28
-
29
-
30
-
31
-
 32
32 -
 33
33 -
 34
34 -
 35
35 -
 36
36 -
 37
37 -
 38
38 -
 39
39 -
 40
40 -
 41
41 -
 42
42 -
43
-
44
-
45
-
46
-
47
-
48
-
49
-
50
-
51
-
52
-
53
-
54
-
55
-
56
-
57
-
58
-
59
-
60
-
61
-
62
-
63
-
64
-
65
-
66
-
67
-
68
-
69
-
70
-
71
 |
 |
