Epson Ensemble HD 6500 Installation Guide - Page 36
to attach the mounting bracket to the ceiling plate and install it on your ceiling.
 |
View all Epson Ensemble HD 6500 manuals
Add to My Manuals
Save this manual to your list of manuals |
Page 36 highlights
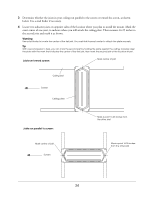
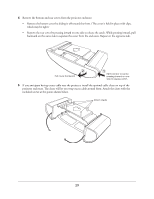
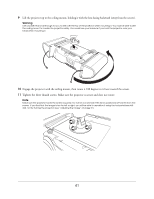
3 Insert the extension arm into the piece shown below. Make sure the set screws in the extension arm are turned in all the way, or you won't be able to insert the arm. Note Do not re-insert the bolts you removed in step 2. You will do this later when you attach the mounting bracket to the ceiling plate, as described in the next section. 4 Insert the extension arm into the lower plate and fasten it with the bolt you removed in step 1. 5 The mounting bracket with the extension arm is now assembled. Continue with the steps in the next section to attach the mounting bracket to the ceiling plate and install it on your ceiling. 36
-
 1
1 -
2
-
3
-
4
-
5
-
6
-
7
-
8
-
9
-
10
-
11
-
12
-
13
-
14
-
15
-
16
-
17
-
18
-
19
-
20
-
21
-
22
-
23
-
24
-
25
-
26
-
27
-
28
-
29
-
30
-
 31
31 -
 32
32 -
 33
33 -
 34
34 -
 35
35 -
 36
36 -
 37
37 -
 38
38 -
 39
39 -
 40
40 -
 41
41 -
42
-
43
-
44
-
45
-
46
-
47
-
48
-
49
-
50
-
51
-
52
-
53
-
54
-
55
-
56
-
57
-
58
-
59
-
60
-
61
-
62
-
63
-
64
-
65
-
66
-
67
-
68
-
69
-
70
-
71
 |
 |

36
3
Insert the extension arm into the piece shown below. Make sure the set screws in the extension arm are
turned in all the way, or you won’t be able to insert the arm.
Note
Do not re-insert the bolts you removed in step 2. You will do this later when you attach the mounting bracket to the
ceiling plate, as described in the next section.
4
Insert the extension arm into the lower plate and fasten it with the bolt you removed in step 1.
5
The mounting bracket with the extension arm is now assembled. Continue with the steps in the next
section to attach the mounting bracket to the ceiling plate and install it on your ceiling.