Epson Ensemble HD 720 Installation Guide - Page 45
Connect the Cables to the Projector, covers to apply them.
 |
View all Epson Ensemble HD 720 manuals
Add to My Manuals
Save this manual to your list of manuals |
Page 45 highlights
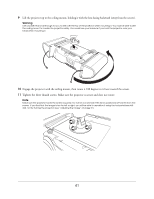
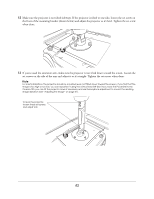
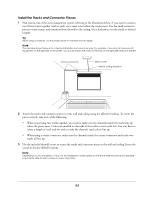
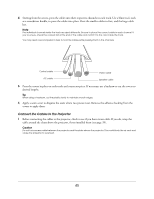
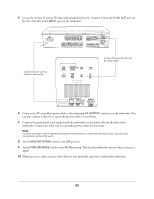
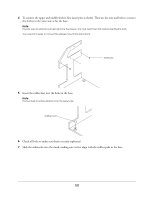
4 Starting from the screen, press the cables into their respective channels in each track. Use a blunt tool, such as a screwdriver handle, to press the cables into place. Press the smaller cables in first, and the large cable last. Note The individual channels inside the track are sized differently. Be sure to place the correct cable in each channel. If you're unsure, check the colored dot at the end of the cable and match it to the color inside the track. You may need a second person's help to hold the cables while pressing them in the channels. Control cable Video cable AC cable Speaker cable 5 Press the covers in place on each track and connector piece. If necessary, use a hacksaw to cut the covers to desired lengths. Tip When using a hacksaw, cut the plastic slowly to maintain smooth edges. 6 Apply a seam cover to disguise the seam where two pieces meet. Remove the adhesive backing from the covers to apply them. Connect the Cables to the Projector 1 Before connecting the cables to the projector, check to see if you have excess cable. If you do, wrap the cable around the cleats above the projector, if you installed them (see page 39). Caution Do not tuck excess cable between the projector and the plate above the projector. This could block the air vent and cause the projector to overheat. 45
-
 1
1 -
2
-
3
-
4
-
5
-
6
-
7
-
8
-
9
-
10
-
11
-
12
-
13
-
14
-
15
-
16
-
17
-
18
-
19
-
20
-
21
-
22
-
23
-
24
-
25
-
26
-
27
-
28
-
29
-
30
-
31
-
32
-
33
-
34
-
35
-
36
-
37
-
38
-
39
-
 40
40 -
 41
41 -
 42
42 -
 43
43 -
 44
44 -
 45
45 -
 46
46 -
 47
47 -
 48
48 -
 49
49 -
 50
50 -
51
-
52
-
53
-
54
-
55
-
56
-
57
-
58
-
59
-
60
-
61
-
62
-
63
-
64
-
65
-
66
-
67
-
68
-
69
-
70
-
71
 |
 |
