Epson LX-90 User Manual - IBM PC Jr. 8690 PIC for LX-90 - Page 55
WIDTH Statements, Multiple-Line Exercise, LPRINT CHR$27KCHR$100CHR$0
 |
View all Epson LX-90 manuals
Add to My Manuals
Save this manual to your list of manuals |
Page 55 highlights
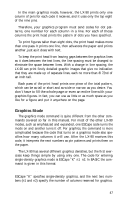
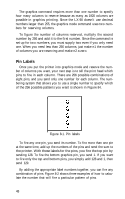
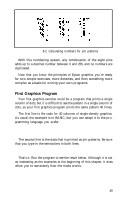
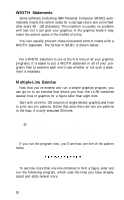
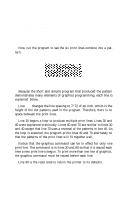
WIDTH Statements Some software (including IBM Personal Computer BASIC) automatically inserts the control codes for a carriage return and a line feed after every 80 - 130 characters. This insertion is usually no problem with text, but it can spoil your graphics. In the graphics mode it may insert the control codes in the middle of a line. You can usually prevent these unwanted control codes with a WIDTH statement. The format in BASIC is shown below: WIDTH "LPT1:",255 Put a WIDTH statement in one of the first lines of all your graphics programs. It is easier to put a WIDTH statement in all of your programs than to examine each one to see whether or not such a statement is necessary. Multiple-Line Exercise Now that you've entered and run a simple graphics program, you can go on to an exercise that shows you how the LX-90 combines several lines of graphics for a figure taller than eight dots. Start with a line for 100 columns of single-density graphics and lines to print two pin patterns. Notice that since there are two pin patterns in the loop, it is only executed 50 times. NEW 10 WIDTH "LPT1:",255 40 LPRINT CHR$(27)"K"CHR$(100)CHR$(0); 50 FOR X=1 TO 50: LPRINT CHR$(85)CHR$(42); 60 NEXT X: LPRINT 100 LPRINT CHR$(27)"@" If you run the program now, you'll see how one line of the pattern looks: To see how more than one line combines to form a figure, enter and run the following program, which uses the lines you have already typed and adds several more. 50
-
 1
1 -
2
-
3
-
4
-
5
-
6
-
7
-
8
-
9
-
10
-
11
-
12
-
13
-
14
-
15
-
16
-
17
-
18
-
19
-
20
-
21
-
22
-
23
-
24
-
25
-
26
-
27
-
28
-
29
-
30
-
31
-
32
-
33
-
34
-
35
-
36
-
37
-
38
-
39
-
40
-
41
-
42
-
43
-
44
-
45
-
46
-
47
-
48
-
49
-
 50
50 -
 51
51 -
 52
52 -
 53
53 -
 54
54 -
 55
55 -
 56
56 -
 57
57 -
 58
58 -
 59
59 -
 60
60 -
61
-
62
-
63
-
64
-
65
-
66
-
67
-
68
-
69
-
70
-
71
-
72
-
73
-
74
-
75
-
76
-
77
-
78
-
79
-
80
-
81
-
82
-
83
-
84
-
85
-
86
-
87
-
88
-
89
-
90
-
91
-
92
-
93
-
94
-
95
-
96
-
97
-
98
-
99
-
100
 |
 |
