Epson LX-90 User Manual - IBM PC Jr. 8690 PIC for LX-90 - Page 56
For X=1 To 50: Lprint Chr$85chr$42
 |
View all Epson LX-90 manuals
Add to My Manuals
Save this manual to your list of manuals |
Page 56 highlights
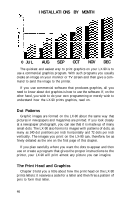
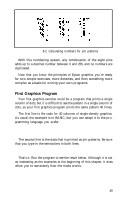
10 WIDTH "LPT1:",255 20 LPRINT CHR$(27)"A"CHR$(7) 30 FOR R=1 TO 3 40 LPRINT CHR$(27)"K"CHR$(100)CHR$(0); 50 FOR X=1 TO 50: LPRINT CHR$(85)CHR$(42); 60 NEXT X: LPRINT 70 LPRINT CHR$(27)"K"CHR$(100)CHR$(0); 80 FOR X=1 TO 50: LPRINT CHR$(42)CHR$(85); 90 NEXT X: LPRINT: NEXT R 100 LPRINT CHR$(27)"@" Now run the program to see the six print lines combine into a pattern: Because the short and simple program that produced the pattern demonstrates many elements of graphics programming, each line is explained below. Line 10 changes the line spacing to 7/72 of an inch, which is the height of the dot patterns used in the program. Therefore, there is no space between the print lines. Line 20 begins a loop to produce multiple print lines. Lines 30 and 40 were explained previously. Lines 60 and 70 are similar to lines 30 and 40 except that line 70 uses a reversal of the patterns in line 40. As the loop is executed, the program prints lines 40 and 70 alternately so that the patterns of the print lines will fit together well. Notice that the graphics command can be in effect for only one print line. The command is in lines 30 and 60 so that it is issued each time a new print line is begun. To print more than one line of graphics, the graphics command must be issued before each line. Line 90 is the reset code to return the printer to its defaults. 51
-
 1
1 -
2
-
3
-
4
-
5
-
6
-
7
-
8
-
9
-
10
-
11
-
12
-
13
-
14
-
15
-
16
-
17
-
18
-
19
-
20
-
21
-
22
-
23
-
24
-
25
-
26
-
27
-
28
-
29
-
30
-
31
-
32
-
33
-
34
-
35
-
36
-
37
-
38
-
39
-
40
-
41
-
42
-
43
-
44
-
45
-
46
-
47
-
48
-
49
-
50
-
 51
51 -
 52
52 -
 53
53 -
 54
54 -
 55
55 -
 56
56 -
 57
57 -
 58
58 -
 59
59 -
 60
60 -
 61
61 -
62
-
63
-
64
-
65
-
66
-
67
-
68
-
69
-
70
-
71
-
72
-
73
-
74
-
75
-
76
-
77
-
78
-
79
-
80
-
81
-
82
-
83
-
84
-
85
-
86
-
87
-
88
-
89
-
90
-
91
-
92
-
93
-
94
-
95
-
96
-
97
-
98
-
99
-
100
 |
 |
