Epson PhotoPC 750Z User Setup Information - Page 45
Transferring Photos With Image Expert, On a PowerPC
 |
View all Epson PhotoPC 750Z manuals
Add to My Manuals
Save this manual to your list of manuals |
Page 45 highlights
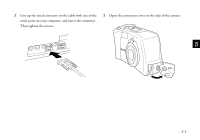
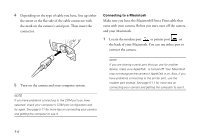
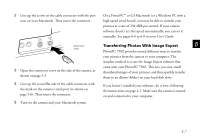
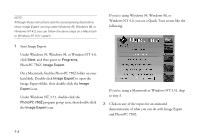
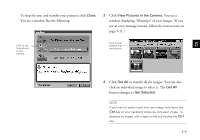
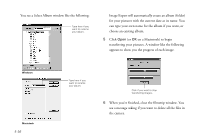
2 Line up the arrow on the cable connector with the port icon on your Macintosh. Then insert the connector. . Macintosh cable 3 Open the connector cover on the side of the camera, as shown on page 5-5. 4 Line up the arrow/flat side of the cable connector with the mark on the camera's serial port (as shown on page 5-6). Then insert the connector. 5 Turn on the camera and your Macintosh system. On a PowerPC™ or G3 Macintosh (or a Windows PC with a high-speed serial board), you may be able to transfer your pictures at a rate of 230.4KB per second. If your camera software doesn't set this speed automatically, you can set it manually. See pages 6-6 to 6-8 in your User's Guide. Transferring Photos With Image Expert 5 PhotoPC 750Z provides several different ways to transfer your pictures from the camera to your computer. The simplest method is to use the Image Expert software that came with your PhotoPC 750Z. This lets you view small thumbnail images of your pictures, and then quickly transfer them to an album (folder) on your hard disk drive. If you haven't installed your software, do it now, following the instructions on page 2-1. Make sure the camera is turned on and connected to your computer. A B 5-7
-
 1
1 -
2
-
3
-
4
-
5
-
6
-
7
-
8
-
9
-
10
-
11
-
12
-
13
-
14
-
15
-
16
-
17
-
18
-
19
-
20
-
21
-
22
-
23
-
24
-
25
-
26
-
27
-
28
-
29
-
30
-
31
-
32
-
33
-
34
-
35
-
36
-
37
-
38
-
39
-
 40
40 -
 41
41 -
 42
42 -
 43
43 -
 44
44 -
 45
45 -
 46
46 -
 47
47 -
 48
48 -
 49
49 -
 50
50 -
51
-
52
-
53
 |
 |