Epson PowerLite 713c User Manual - Page 21
Connecting to Video Sources, Connecting the RCA A/V Cable
 |
View all Epson PowerLite 713c manuals
Add to My Manuals
Save this manual to your list of manuals |
Page 21 highlights
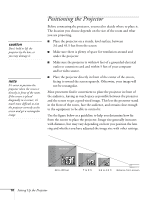
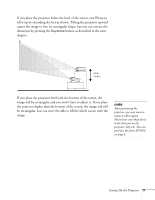
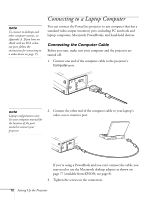
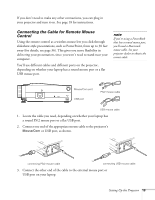
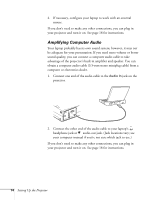
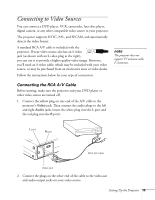
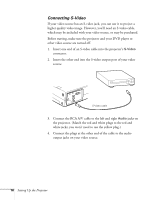
Connecting to Video Sources You can connect a DVD player, VCR, camcorder, laser disc player, digital camera, or any other compatible video source to your projector. The projector supports NTSC, PAL, and SECAM, and automatically detects the video format. A standard RCA A/V cable is included with the 1 2 projector. If your video source also has an S-video 3 4 jack (as shown with an S-video plug at the right), you can use it to provide a higher quality video image. However, you'll need an S-video cable, which may be included with your video source, or may be purchased from an electronics store or video dealer. Follow the instructions below for your type of connection. note The projector does not support TV antenna cable F connectors. Connecting the RCA A/V Cable Before starting, make sure the projector and your DVD player or other video source are turned off. 1. Connect the yellow plug on one end of the A/V cable to the projector's Video jack. Then connect the audio plugs to the left and right Audio jacks (insert the white plug into the L port and the red plug into the R port). L port R port RCA A/V cable Video jack 2. Connect the plugs on the other end of the cable to the video-out and audio output jacks on your video source. Setting Up the Projector 15
-
 1
1 -
2
-
3
-
4
-
5
-
6
-
7
-
8
-
9
-
10
-
11
-
12
-
13
-
14
-
15
-
 16
16 -
 17
17 -
 18
18 -
 19
19 -
 20
20 -
 21
21 -
 22
22 -
 23
23 -
 24
24 -
 25
25 -
 26
26 -
27
-
28
-
29
-
30
-
31
-
32
-
33
-
34
-
35
-
36
-
37
-
38
-
39
-
40
-
41
-
42
-
43
-
44
-
45
-
46
-
47
-
48
-
49
-
50
-
51
-
52
-
53
-
54
-
55
-
56
-
57
-
58
-
59
-
60
-
61
-
62
-
63
-
64
-
65
-
66
-
67
-
68
-
69
-
70
-
71
-
72
-
73
-
74
-
75
-
76
-
77
-
78
-
79
-
80
-
81
-
82
-
83
-
84
-
85
-
86
-
87
-
88
-
89
-
90
-
91
-
92
-
93
-
94
-
95
-
96
-
97
-
98
-
99
-
100
-
101
-
102
-
103
-
104
-
105
 |
 |