Epson PowerLite 713c User Manual - Page 41
Drawing Horizontal and Vertical Lines, Drawing Freehand Lines
 |
View all Epson PowerLite 713c manuals
Add to My Manuals
Save this manual to your list of manuals |
Page 41 highlights
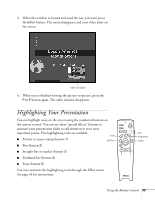
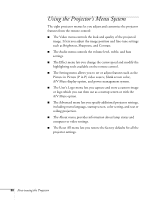
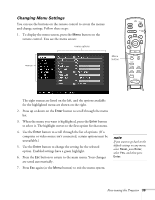
Drawing Horizontal and Vertical Lines You can draw horizontal or vertical lines on the screen to underline or highlight your presentation points. 1. To activate the line or marker tool, press the 3 button on the remote control. A pink marker icon appears in the upper left corner of the screen. This is the "line-drawing" tool. 2. Use the Enter button to move the marker where you want to begin drawing the line. 3. To define the beginning of the line, press down in the center of the Enter button. You see a corner mark on the screen. 4. Use the Enter button to drag the marker where you want the line to end. 5. Press down in the center of the Enter button. You see a line on the screen, as shown at the right. You can continue placing lines on the screen by repeating steps 2 through 5. 6. To erase the line(s), press the 5 button. 7. To cancel the line drawing feature, press Esc. Drawing Freehand Lines The freehand drawing tool lets you click and drag to draw opaque marks anywhere on the screen. 1. To activate the freehand tool, press the 4 button on the remote control. A pointing hand appears in the upper left corner of the screen. 2. Use the Enter button to move the hand where you want to begin drawing. 3. Press down in the center of the Enter button to start your line and then press the edges of the Enter button to move around and draw. 4. To end a line or shape after drawing it, press down in the center of the Enter button. note You can use the projector's Effect menu to change the width and color for both "marker" and freehand lines. See page 43. Using the Remote Control 35
-
 1
1 -
2
-
3
-
4
-
5
-
6
-
7
-
8
-
9
-
10
-
11
-
12
-
13
-
14
-
15
-
16
-
17
-
18
-
19
-
20
-
21
-
22
-
23
-
24
-
25
-
26
-
27
-
28
-
29
-
30
-
31
-
32
-
33
-
34
-
35
-
 36
36 -
 37
37 -
 38
38 -
 39
39 -
 40
40 -
 41
41 -
 42
42 -
 43
43 -
 44
44 -
 45
45 -
 46
46 -
47
-
48
-
49
-
50
-
51
-
52
-
53
-
54
-
55
-
56
-
57
-
58
-
59
-
60
-
61
-
62
-
63
-
64
-
65
-
66
-
67
-
68
-
69
-
70
-
71
-
72
-
73
-
74
-
75
-
76
-
77
-
78
-
79
-
80
-
81
-
82
-
83
-
84
-
85
-
86
-
87
-
88
-
89
-
90
-
91
-
92
-
93
-
94
-
95
-
96
-
97
-
98
-
99
-
100
-
101
-
102
-
103
-
104
-
105
 |
 |